
To clean a vaporizer the right way, brush out the chamber after every session, lightly swab the rim and screen every few sessions, and deep-clean the mouthpiece and removable screens every 5–10 sessions by soaking them in isopropyl alcohol, rinsing, and fully air-drying before reassembly. [1] [2] The core routine below is the same across dry herb, concentrate, portable, and desktop devices — the clean vaporizer habit that holds up over months.
The housing, charging port, and any soft-touch finishes get a dry or barely damp cloth only — never alcohol and never excess moisture, since both can wick past seams and damage the electronics. [4] The guide below walks through that routine section by section: how to spot when a screen or O-ring needs replacing, how to care for the lithium-ion battery at the same time, and which cleaning supplies are worth keeping on hand. If you’ve never disassembled your device before, start with our damage-free walkthrough on How Do You Clean a Vaporizer Without Damaging It?.
How Often Should You Clean a Vaporizer?
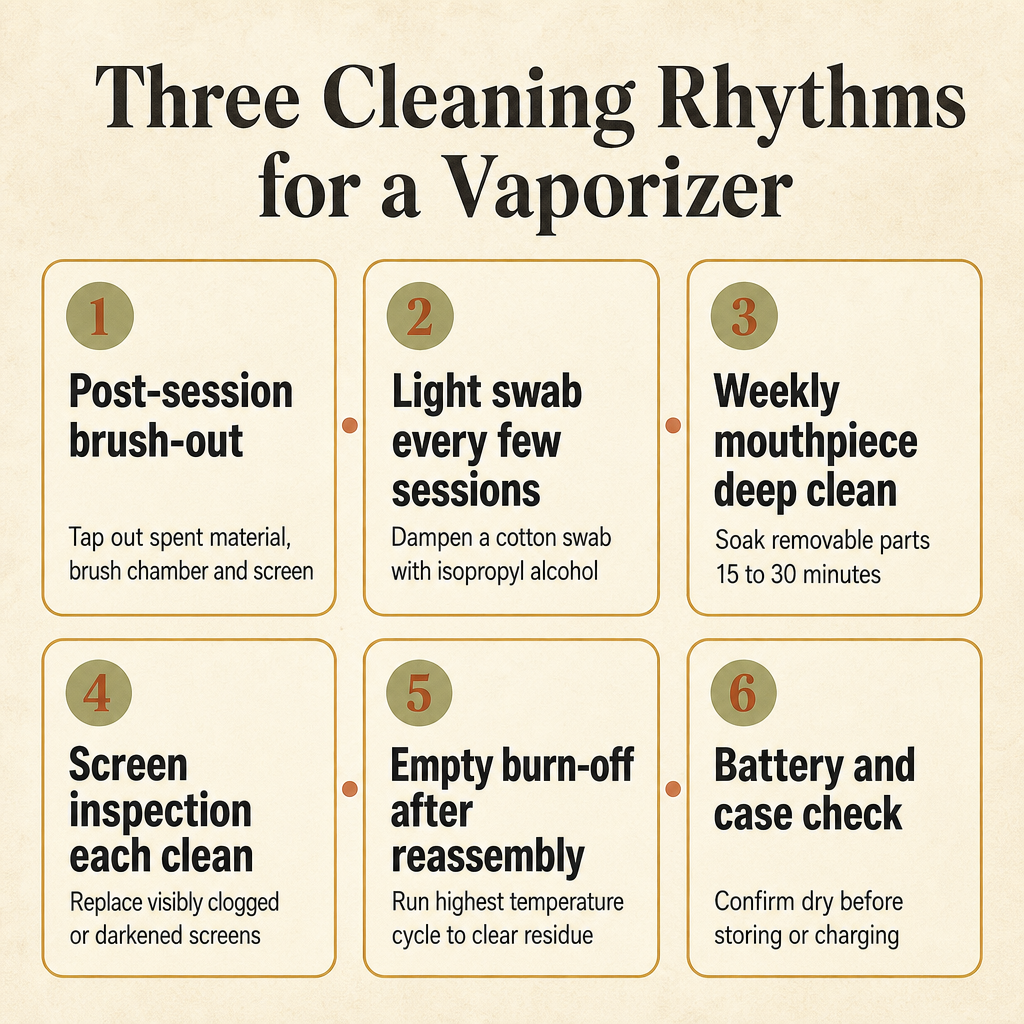
Manufacturer cleaning guides split the work into three rhythms so no single session becomes a deep-clean project. Once those cadences are set, the rest of the routine is just showing up on schedule. Most owners underestimate how short the post-session brush-out takes — roughly five minutes from power-off to sealed case — and that quick step is what keeps the longer clean from ever feeling grimy.
A useful way to think about the schedule is by what gets touched each round. The chamber sees material every draw, so it gets brushed every session. The rim and screen pick up residue more slowly, so a light swab every few sessions is enough. The mouthpiece, glass spacers, and screens collect cooled vapor fastest, so they get a full soak only every 5–10 sessions, depending on how heavily the device is used.
If you only have time for one of the three, do the post-session brush-out. A quick tap, a few brush strokes, and a swab of the rim keeps the chamber from becoming the sticky mess that requires a long soak to undo. The deep clean becomes maintenance rather than rescue. [3]
- Post-session brush-out (after every use): tap out spent material, brush the chamber and screen, and wipe the rim.
- Light swab every few sessions (every 3–5 uses): lightly dampen a cotton swab with isopropyl alcohol and run it around the chamber rim and screen edge.
- Weekly mouthpiece deep clean (every 5–10 sessions): soak removable mouthpiece parts and screens for 15 to 30 minutes in isopropyl alcohol.
- Monthly screen inspection: check every screen under good light and replace any that look clogged or darker than bronze.
- Storage check before closing the case: confirm parts are dry and the device is powered off.
What Supplies Do You Need to Clean a Vaporizer?
A small, well-chosen kit covers almost every cleaning job on a modern vaporizer. Most of what you need is the same across dry herb portables, concentrate pens, and desktop units — the only thing that changes is the size of the brush and the spare parts. Owners who improvise with paper towels, household sprays, or kitchen scrubbers usually end up with clogged screens, scratched glass, or moisture where it does not belong.
Two concentrations come up often when reading manufacturer guides: 90% and 91% or higher isopropyl alcohol. Both work for soaking metal and glass parts. Lower concentrations (70%) leave more water behind and take longer to dry, so the higher-concentration bottle is worth the small upcharge. Keep the alcohol in a sealed bottle between uses so it does not absorb moisture from the air.
Pipe cleaners and a small chamber brush are the two tools that get into places cotton swabs cannot reach. A short, stiff brush works for the chamber itself; flexible pipe cleaners bend around the cooling unit and through narrow airpath corners. For owners who want to time their cleaning to how often they actually use the device, our How Often Should You Clean Smoking Accessories? lays out a usage-based schedule that pairs with the kit below. [4]
- Isopropyl alcohol (90% or higher): for soaking removable metal and glass parts, and for lightly dampening cotton swabs.
- Cotton swabs: for swabbing the chamber rim, screen edges, and small crevices — use them lightly moistened, never soaked.
- Small chamber brush (often shipped with the device): for brushing the oven, screen, and airpath after each session.
- Pipe cleaners: for narrow airpath corners and the cooling unit, where cotton swabs are too thick to fit.
- Soft lint-free cloth or microfiber cloth: for wiping the housing and the outside of the charging cable.
- Spare screens and O-rings matched to your model: kept in a small bag so a worn screen can be swapped mid-clean instead of waiting for a parts order.
How Do You Clean a Dry Herb Vaporizer Chamber Step by Step?
The chamber is the part that touches material on every draw, so it gets the most attention. The routine below works for dry herb portables and desktops alike; concentrate chambers follow the same rhythm but with shorter soak times and no water rinse for the heating element. The point of every step is to remove residue without letting liquid reach the heater or the electronics.
Before anything else, power the device off and let it cool. A warm chamber is softer and more prone to damage from brush bristles, and any alcohol applied to a warm surface flashes off too quickly to do its job. Once the device is cool to the touch, tap it gently over a tray or scrap container to dislodge the spent material, then move on to brushing.
For the deeper clean, lightly dampen — do not soak — a cotton swab with isopropyl alcohol and run it around the rim where residue tends to build up. For stubborn spots, hold the swab against the spot for a few seconds before wiping. If your device uses a separate chamber screen, lift it out, brush both sides, and set it aside for the soak in the next section. Our How Do You Clean Glass Accessories With Isopropyl Alcohol? covers the same swab-and-soak approach for glass accessories. [1] [4]
- Power off the device and let it cool until it is comfortable to hold — usually five to ten minutes after the last draw.
- Tap the device over a tray to dislodge spent material; do not blow into the chamber, since breath moisture can condense on the heater.
- Brush the chamber walls and the screen with the supplied cleaning brush, working from the bottom up so residue moves out of the airpath.
- Lightly dampen a cotton swab with isopropyl alcohol and run it around the chamber rim — the swab should feel moist, not dripping.
- For built-up residue, hold the dampened swab against the spot for a few seconds before wiping; repeat with a fresh swab until the swab comes away clean.
- Set any removable screens aside in a small container for the mouthpiece deep clean; never leave them sitting loose where they can collect dust.
How Do You Clean a Vaporizer Mouthpiece and Screen?
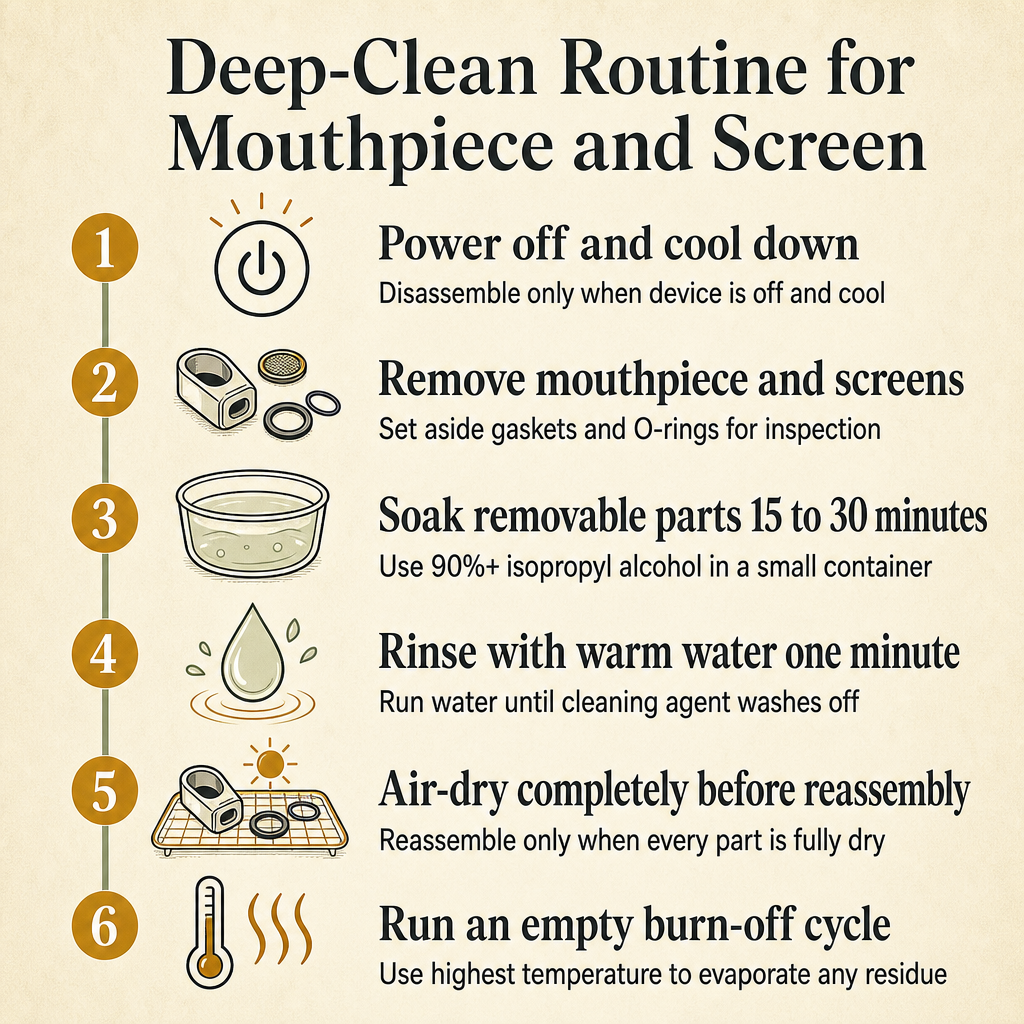
Mouthpieces and screens collect residue fastest because vapor cools and condenses there on every draw. Removable parts can be soaked in isopropyl alcohol for roughly 15 to 30 minutes, then rinsed with warm water and air-dried completely before reassembly. Storz & Bickel’s official support page sets a maximum 30-minute soak for parts like the Cooling Unit and Filling Chamber Screen, and warns that cotton swabs should only be lightly moistened — never saturated. [4]
Disassemble only as far as the manufacturer recommends. Many modern devices have a cooling unit that pops out as a single piece; on those, do not pry further into the body. Older units with screw-on mouthpieces are simpler, but the same rule applies — if a part does not come apart easily with fingers, leave it alone and clean around it instead. Replacement screens, gaskets, and cooling units for most major brands are stocked as standard Screens parts, so there is little reason to force anything.
After the soak, run warm water over each part for at least a full minute so no alcohol residue remains. Pat dry with a lint-free cloth and set the parts on a clean towel in a dust-free spot for at least an hour, longer if your home is humid. Reassembling even slightly damp parts is the most common reason a freshly cleaned device produces thin, unsatisfying vapor on the first draw — the residual moisture cools the airpath before it leaves the mouthpiece. [1]
- Disassemble the mouthpiece only as far as the manual describes; stop if a part resists finger removal.
- Place removable metal and glass parts in a small container and cover with 90%+ isopropyl alcohol for 15 to 30 minutes.
- For sticky buildup, add enough alcohol to fully submerge the parts; never soak plastic or silicone parts in alcohol.
- Rinse each part under warm running water for at least one minute so cleaning agent washes off completely.
- Set parts on a lint-free towel and air-dry for at least an hour — longer in humid environments — before reassembly.
- Inspect each screen under good light; replace any screen that is visibly clogged, darker than bronze, or no longer allows clear airflow.
How Do You Clean the Housing, Airpath, and Charging Port Safely?
The body, airpath seams, and USB-C port are the easiest parts of a vaporizer to damage with the wrong cleaner. Manufacturer support pages direct owners to wipe the housing and the outside of the charging cable with a dry or only slightly damp soft cloth, and to keep alcohol and excess moisture away from the charging port and any soft-touch or rubberized finish. [4]
The reason for the dry-cloth rule is straightforward: alcohol and water can wick past seams, under rubberized grips, and into the charging port, where they corrode contacts or short electronics. Even a small amount of liquid trapped behind a soft-touch panel can lift the finish and leave a permanent tacky spot. When in doubt, less is more — a cloth that feels barely damp to the touch is plenty for routine smudges.
For the airpath itself, pipe cleaners and the small brush are the right tools. Work from the mouthpiece end so debris moves outward rather than deeper into the body. For owners who use accessories like rolling trays and small stash jars nearby, the Rolling Trays category includes storage surfaces that keep the cleaning area organized, but the housing itself still wants a dry cloth only.
- Do wipe the housing and charging cable with a dry or barely damp soft cloth for routine smudges.
- Do use pipe cleaners for narrow airpath corners where a cotton swab is too thick to fit.
- Do brush the outside of the mouthpiece after every session with the supplied brush.
- Do not apply isopropyl alcohol to the housing, the charging port, or any soft-touch or rubberized finish.
- Do not pour or spray any liquid into the charging port or the body seams.
- Do not submerge the device body in water, even briefly — the electronics are not rated for it on any consumer vaporizer.
When Should You Replace Screens, O-Rings, or Mouthpiece Parts?
Cleaning extends parts, but every screen, gasket, and O-ring has a wear point. Manufacturer guides frame replacement as a normal part of maintenance: replace screens when they are visibly clogged, darker than bronze, or no longer allow clear airflow; replace O-rings and gaskets that no longer seat firmly; and replace stained mouthpieces rather than scrubbing them indefinitely. [2] [3]
A clogged screen is more than an inconvenience. Once airflow is restricted, the device works harder to push vapor through, which changes how heat distributes across the chamber and can shorten heater life. Owners who ignore a darkened screen usually notice the taste shift before the airflow shift, and by that point the screen has usually baked on enough residue that even a long soak will not return it to bronze.
O-rings and gaskets fail more quietly. The first sign is often a faint hiss at the seam where the device used to seal silently, followed by a drop in vapor density because air leaks around the seal instead of through the chamber. Gasket and O-ring sets for common vaporizer models are stocked as standard Replacement Parts inventory, so swapping a worn seal is a five-minute job once the spare is on hand. Mouthpiece staining, on glass and on heat-resistant polymer mouthpieces, tends to set in over months of use — once discoloration is visible under good light, replacement is the practical answer.
- Replace screens when they are visibly clogged, darker than bronze, or fail the airflow test (hold the device up to a window — light should pass through the screen clearly).
- Replace O-rings when the device no longer seals with a confident click, or when you hear a faint hiss at the seam during a draw.
- Replace cooling-unit gaskets when vapor density drops even after a deep clean, since a leaking gasket is the usual cause.
- Replace glass spacers when chips appear at the rim or when clouding sets in from repeated heat cycling.
- Replace mouthpieces when staining no longer lifts after two consecutive deep cleans, since residue has usually bonded to the surface by that point.
- Keep a small bag of model-matched spares so any of the above can be swapped mid-clean instead of waiting on a parts order.
How Do You Care for the Vaporizer Battery While You Clean?
Cleaning and battery care happen on the same counter, so plan them together. Health Canada’s lithium-ion battery guidance — written for the same battery chemistry used in portable vaporizers — recommends storing batteries at room temperature in a dry location, away from direct sunlight or hot vehicles, and charging only with the manufacturer-supplied or a compatible replacement charger. [5]
For a portable vaporizer, the practical version of that guidance looks like this: let the device cool before charging, charge on a hard, non-soft surface (so heat can dissipate), and unplug once the indicator shows a full charge. Charging on a couch cushion or under a pillow is a common cause of the slow overheating that ages lithium-ion cells prematurely.
Battery inspection belongs on the same schedule as screen inspection. A device that runs hot during a charge it used to handle comfortably, or that shuts off mid-session at charge levels where it used to run for the full draw, is showing the early signs of a worn cell. Stop using the device and contact the manufacturer before resuming normal use. For owners shopping for a replacement portable, options like the Lemonnade X G Pen Roam Portable E-Rig Vaporizer concentrate device show how modern chargers and battery management are integrated into the body, which simplifies daily care considerably. [3]
- Charge at room temperature on a hard surface — never on a couch, bed, pillow, or any soft surface that traps heat.
- Use only the charger that shipped with the device, or a manufacturer-approved replacement of the same voltage and current rating.
- Unplug once the indicator shows a full charge; do not leave the device plugged in overnight as a routine habit.
- Store the device at room temperature in a dry spot — out of direct sunlight and out of vehicles, where cabin temperatures swing widely.
- Inspect the battery monthly: if the device runs hot during charging, swells visibly, or shuts off mid-session at normal charge levels, stop using it.
- Keep the device out of reach of children and pets, and never carry a loose spare battery in a pocket alongside keys or coins.
How Do You Finish a Cleaning Session and Burn Off Residue?
The last step most owners skip is the empty burn-off. Once every part is fully dry and the device is reassembled, run it at its highest temperature for a single empty cycle to evaporate any remaining moisture or cleaning agent from the chamber and airpath. Skipping this step is the most common reason a freshly cleaned vaporizer produces thin, off-tasting vapor on the first draw — what you are tasting is leftover moisture, not the device. [2]
The burn-off only needs to run long enough for the device to reach its top temperature and hold it for a minute or two. There is no benefit to running it for ten minutes, and on some devices extended high-heat cycles with no material in the chamber can shorten heater life. One short cycle, a quick cool-down, and the device is ready for normal use.
After the burn-off, the routine closes out the way it opened: confirm everything is dry, the device is powered off, and the case is sealed. Owners with a desktop unit — usually plugged in at a fixed station rather than carried — can pair the empty burn-off with a quick inspection of the whip, hose, or balloon attachment, since those collect residue at the same rate as a portable mouthpiece. Replacement hoses and attachments for common desktop units are usually stocked alongside the Desktop Vaporizers category on most vaporizer storefronts. [3]
- Reassemble the device only after every part is dry to the touch — no exceptions for screens, mouthpieces, or cooling units.
- Set the device to its highest temperature and run one empty cycle, holding the top temperature for about a minute.
- Let the device cool for two to three minutes after the burn-off before the first real draw.
- Confirm the case or storage pouch is clean and dry before putting the device away.
- Log the cleaning session in a simple note (date and the rhythm used) so the next session’s rhythm is easy to remember.
- If the first real draw still tastes off, run a second short burn-off before assuming something is wrong with the device.
Frequently Asked Questions
How often should I clean my vaporizer?
Manufacturer guides break it into three rhythms: brush out the chamber after every session, lightly swab the rim and screen every few sessions, and deep-clean the mouthpiece and removable screens roughly every 5–10 sessions for moderate use.
What is the best way to clean a dry herb vaporizer chamber?
Power the device off and let it cool fully, tap out spent material, brush the chamber and screen, then lightly swab the rim with a cotton swab dampened with 90% or higher isopropyl alcohol. Do not pour liquid into the heater and do not soak the chamber itself.
Can I use isopropyl alcohol to clean a vaporizer, and at what concentration?
Yes, for the removable mouthpiece, screens, and metal or glass parts — 90% or higher isopropyl alcohol is the concentration manufacturers recommend. Storz & Bickel sets a maximum 30-minute soak for parts like the Cooling Unit and Filling Chamber Screen, and cotton swabs should only be lightly moistened, never saturated.
How do I clean a vaporizer mouthpiece and screen without damaging them?
Disassemble the mouthpiece and screen, soak them in isopropyl alcohol for roughly 15 to 30 minutes, rinse with warm water for at least one minute, and let them air-dry completely before reassembly. Never reassemble a part that still feels damp.
What cleaning supplies do I need to maintain a vaporizer?
A compact kit of 90%+ isopropyl alcohol, cotton swabs, a small cleaning brush, pipe cleaners, a soft lint-free cloth, and spare screens and O-rings matched to your model covers most vaporizer maintenance.
How do I know when to replace the screen, O-ring, or gasket on my vaporizer?
Replace screens when they are visibly clogged, darker than bronze, or no longer allow clear airflow. Replace O-rings and gaskets that no longer seat firmly, and replace stained mouthpieces rather than scrubbing them indefinitely — once residue has set into a part, cleaning only goes so far.
What Is the Simplest Vaporizer Cleaning Routine You Can Actually Keep Up With?
The simplest routine that holds up over months is the three-rhythm version: a five-minute brush-out after every session, a quick swab every few sessions, and a 15-to-30-minute soak of the mouthpiece and screens every 5–10 sessions. Pair that with a dry cloth for the housing, the manufacturer-supplied charger for the battery, and a small bag of model-matched spare screens and O-rings, and the device handles its own upkeep without ever becoming a weekend project.
The pieces that owners tend to drop first are the post-session brush-out and the empty burn-off. Both feel optional in the moment, but both are what keeps the long clean from becoming a recovery job. Set a phone reminder for the deep clean, keep the kit in the same place as the device, and the rest is just showing up. Free shipping on orders $150+ applies across Treehouse Lifestyle if you need to restock cleaning supplies or spare parts.
Sources
- Healthy Rips: Vaporizer Cleaning Guide | Maintain Peak Performance
- DaVinci Vaporizer: Step-by-Step Vaporizer Maintenance Guide: Keep Your Device in Top Shape
- XVAPE USA: How to Maintain Your Portable Dry Herb Vaporizer for Peak Performance
- Storz & Bickel GmbH: Cleaning – Storz & Bickel Support
- Health Canada (Government of Canada): Battery safety: Lithium-ion batteries