
To clean a vaporizer without damaging it, let the device cool, remove only the parts named as removable in its manual, and keep all liquid away from the heater, battery, charging port, and electronics. Brush away loose residue first. Then use 91 to 99 percent isopropyl alcohol on a cotton swab or pipe cleaner only for surfaces the manufacturer says can handle it. [1] [2]
Do not assume every removable part can soak. A maker may allow alcohol or soapy water for one mouthpiece but require the oven, screen, or lid to be wiped only. Silicone O-rings and plastic parts should stay out of alcohol unless the maker clearly approves it. Let everything dry fully before you put the device back together.
What Tools Do You Need to Clean a Dry Herb Vaporizer?
A small cleaning kit makes the job easier and helps you control where liquid goes. You do not need to pour solvent into the device or use sharp tools that may scratch an oven or tear a seal.
Start with the brush that came with your vaporizer if you still have it. Its size and shape may fit the oven, screen, or cooling unit better than a general brush. A soft, clean brush can lift dry crumbs before they become stuck-on buildup.
Cotton swabs and pipe cleaners give you more control than a wet cloth. Dip the tip, then press out extra liquid before touching a compatible surface. The applicator should be damp, not dripping.
XVAPE identifies 91 to 99 percent isopropyl alcohol as a standard cleaner for compatible chambers, screens, mouthpieces, and cooling units. That does not mean every part from every model can soak, so the manual still wins. [2]
Keep plain water and mild dish soap nearby only when the maker permits them. Clean water is also useful for rinsing approved glass or metal pieces after a soak. Use a lint-free cloth or paper towel for drying, and place small parts in a dish so they do not roll away.
Wear protective gloves while handling isopropyl alcohol, especially during a deeper cleaning. Work in a ventilated area and close the alcohol bottle when it is not in use. [6]
You can find brushes, swabs, and other basics in our Cleaning Supplies, then compare compatible devices in our Vaporizers collection. For model differences that affect cleaning, see How Do Dry Herb Vaporizers Differ from Concentrate Vaporizers?.
- Dry tools: a soft brush, the maker’s cleaning brush, and a small dish for loose parts.
- Controlled applicators: cotton swabs, pipe cleaners, and a lint-free cloth.
- Compatible liquids: 91 to 99 percent isopropyl alcohol, plus water or mild soapy water only where the manual permits.
- Drying supplies: clean paper towels or a cloth and an open space where parts can air-dry.
- Personal protection: disposable gloves and good room ventilation.
How Often Should You Clean a Dry Herb Vaporizer?
A light cleanup after each session keeps residue from becoming a hard layer. A deeper cleaning about once a week is a useful starting point for a device used often. Manufacturer and specialist guidance support regular oven brushing and a deeper disassembly routine. [2] [4]
Your real schedule depends on use. A device used several times a day may need attention sooner, while one used less often may go longer. Check airflow and visible buildup instead of relying only on the calendar.
After the device cools, empty the oven and brush away loose material. Look at the rim and screen. If residue remains, use a lightly damp swab only if the manual allows alcohol on those surfaces.
The mouthpiece and vapor path deserve regular checks because narrow passages can collect residue. Removable cooling units may also need cleaning, but each model opens in a different way. Never force a part that does not release as the manual shows.
A weekly deep clean usually means removing approved pieces, cleaning each one by its material and maker instructions, drying every part, and putting the device back together. This is also a good time to inspect screens, O-rings, seals, and the charging area.
Clean sooner if the screen looks clogged, the controls feel sticky, or airflow is restricted. Do not solve a performance problem by pushing a tool deeper into the device. Stop and check the manual if the blockage is in a fixed or electronic area.
For a broader care schedule, see The Complete Guide to Cleaning Smoking Accessories. Cleaning needs can also vary by form factor, as explained in Portable vs Desktop Vaporizer: Which Fits Your Routine?.
- After each session: let the oven cool, empty it, and brush out loose residue.
- As needed: wipe an approved oven rim or screen with a controlled, lightly damp swab.
- About weekly for frequent use: disassemble only approved parts and complete a deeper clean.
- During every deep clean: inspect the mouthpiece, vapor path, cooling unit, screen, and seals.
- Clean sooner: act when buildup is visible, parts feel sticky, or airflow becomes restricted.
Which Vaporizer Parts Can You Clean With Isopropyl Alcohol?
The correct answer depends on the exact vaporizer. A material may look like metal, glass, or plastic but still include a coating, adhesive, seal, or hidden electronic contact. Check the maker’s cleaning chart before using alcohol.
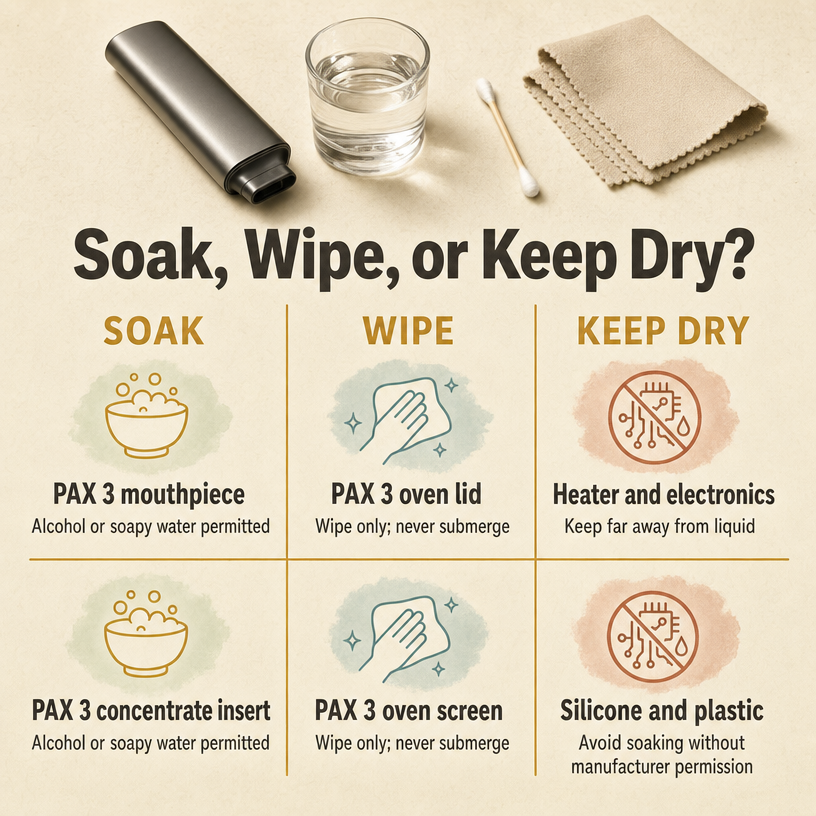
PAX says the PAX 3 mouthpiece and concentrate insert may be cleaned with isopropyl alcohol or soapy water. The same guide says the oven lid, oven screen, and oven chamber should be wiped with a moist swab or alcohol wipe and should not be submerged. [1]
That example shows why one rule cannot cover every device. A removable mouthpiece may be soak-approved on one model and wipe-only on another. Even parts from the same device can have different instructions.
Metal, ceramic, and glass pieces are often compatible with isopropyl alcohol, and specialist guidance calls it an efficient option for residue and oils. Still, material alone is not permission to soak. A glass path with a glued seal or a metal unit with an attached gasket may need a different method. [5]
Silicone O-rings and plastic parts need extra care. Alcohol may cause swelling, clouding, or damage, so keep them out of a soak unless the maker approves those exact pieces. [4] [6]
The heater, battery, display, buttons, charging port, and internal electronics must stay dry. Do not pour alcohol into an oven, over an air inlet, or through a vapor path that cannot be removed. Use a damp applicator on approved fixed surfaces and keep the device powered off.
If you also maintain glass concentrate gear, How Do You Clean a Dab Rig and Keep It Working Well? explains a separate process; do not copy that soaking method onto a vaporizer body.
- Soak only with permission: removable metal or glass pieces, or a named mouthpiece or insert that the maker clearly approves.
- Wipe only: oven chambers, lids, screens, rims, or fixed vapor paths when the manual calls for a damp swab or alcohol wipe.
- Keep dry: heaters, batteries, screens with electronics behind them, charging ports, controls, and the device body.
- Check before exposure: silicone O-rings, rubber seals, plastic pieces, coated parts, adhesives, and mixed-material assemblies.
- Use another approved method: mild soapy water or a dry brush when the maker lists it for that exact part.
| Part or material | Usual approach | What to confirm |
|---|---|---|
| Approved removable metal or glass | Wipe or soak as directed | No attached plastic, seals, adhesive, or electronics |
| Oven, lid, or fixed screen | Wipe with a damp swab | Whether removal or submersion is forbidden |
| Silicone or plastic | Keep out of alcohol unless approved | Exact material and maker permission |
| Heater and electronics | Keep completely dry | Do not pour, rinse, or soak |
How Do You Clean the Oven, Mouthpiece, Vapor Path, and Screens?
Read the device manual before taking anything apart. Find the maker’s list of removable pieces, approved liquids, soak times, and areas that must stay dry. If your model’s directions differ from a general guide, follow the maker.
Turn the vaporizer off and let it cool completely. Remove the battery only if the manual tells you to and the battery is designed to be removed. Never clean a powered, charging, or hot device.
Work over a tray or towel so tiny screens and seals are easy to find. Arrange pieces in removal order or take a quick photo before disassembly. This makes correct reassembly much easier.
Use dry cleaning first. Hold the cooled device so loose crumbs fall out instead of deeper inside, then brush the oven gently. Avoid metal picks unless the maker supplies or approves one because a hard point can scratch a chamber or damage a screen.
For a fixed oven, dampen a cotton swab with the approved cleaner and press out extra liquid. Wipe the wall, rim, and screen without flooding openings. PAX, for example, calls for wiping its oven parts rather than submerging them. [1]
Clean the mouthpiece and cooling unit according to their materials. If soaking is approved, place only the named removable pieces in a small covered dish for the stated time. Keep O-rings and plastic pieces separate unless the manual permits alcohol exposure.
Run a pipe cleaner through a removable vapor path only if it fits without force. Turn or draw it through gently instead of jamming it around a bend. Replace the applicator as it becomes dirty so you do not spread residue back over the surface.
A removable screen can be brushed, wiped, or soaked only as directed. Hold it by the edge and do not bend its mesh. If it remains hard, dark, or blocked after an approved cleaning, replacement may be the better choice.
Rinse only parts that the manufacturer says may be rinsed. Use clean water and keep rinsed pieces far from the device body. Alcohol-wiped fixed areas should be left open to air-dry rather than flushed with water.
Give all parts enough time to dry fully. Check holes, grooves, and the underside of seals because liquid can hide there. Reassemble in the correct order without pinching an O-ring or forcing a screen into place.
When a worn mesh part cannot be restored, browse compatible Screens rather than forcing an incorrect size into the device.
- Turn the device off, unplug it, let it cool, and review the model-specific cleaning instructions.
- Remove only the mouthpiece, cooling unit, screen, lid, seals, or other pieces the maker marks as removable.
- Brush loose residue from the oven and other dry surfaces before adding any cleaner.
- Use a damp cotton swab or pipe cleaner on approved fixed surfaces; do not pour liquid into the device.
- Soak only named, compatible removable parts and keep plastic, silicone, seals, and mixed-material parts out unless approved.
- Rinse only permitted pieces, then place every cleaned part on a clean towel to air-dry completely.
- Inspect screens and seals, reassemble without force, and confirm that no moisture remains before power is restored.
How Do You Keep Alcohol Away From Electronics, Plastic, and Seals?
Control the alcohol instead of trying to control a spill. Pour a small amount into a separate dish, close the main bottle, and dip only the end of a swab or pipe cleaner. Press the applicator against the dish edge so it is damp rather than dripping.
Keep the vaporizer body upright or tilted so moisture moves away from openings. Do not clean over the charging port, buttons, battery bay, air inlet, display, or heater. If liquid reaches an area the manual says must stay dry, do not power the device on.
Remove O-rings and seals before soaking a compatible part when the manual shows how. Do not stretch them with sharp tools. Store them in a separate dish and clean them only with the method approved for their material.
Isopropyl alcohol is flammable. NIOSH lists its lower explosive limit in air as 2.0 percent, so work with ventilation and keep the cleaner away from flames, sparks, smoking materials, and hot devices. [3]
Gloves can limit skin contact while you clean. If alcohol spills, follow the label directions and air out the work area. Do not use a hair dryer, heat gun, or open flame to make parts dry faster.
Time and moving air are the sensible drying tools. Leave parts apart until no liquid, alcohol smell, or dampness remains in grooves. Full drying must happen before reassembly, charging, or a manufacturer-approved burn-off.
Material rules vary across accessories. Even silicone pieces such as our Silicone Bongs should be cleaned according to their own maker instructions, not a vaporizer routine.
- Power off, unplug, and cool the vaporizer before bringing alcohol near it.
- Move a small amount of alcohol to a dish and use a damp swab instead of pouring or spraying.
- Shield charging ports, buttons, displays, air inlets, heaters, batteries, and all internal electronics.
- Separate silicone O-rings, rubber seals, plastic parts, and mixed-material pieces unless their instructions allow alcohol.
- Open a window or use another well-ventilated work area, and remove all flames, sparks, and heat sources.
- Wear gloves, let parts air-dry fully, and do not restore power while any moisture remains.
When Should You Replace a Vaporizer Screen Instead of Cleaning It?
Routine cleaning can save a screen that has loose or soft residue. Brush it after the device cools, then use the approved wipe or soak method if the screen is removable. Do not keep scrubbing a screen that has changed shape or no longer opens up.
XVAPE identifies darkening, hardening, and restricted airflow as signs that a screen should be replaced. A clogged screen can also push heat toward places where it was not meant to go and may reduce battery performance. [2]
Compare the cleaned screen with a new replacement made for your model. The holes should be open, the mesh should sit flat, and the edge should fit without force. A screen that is bent, torn, frayed, or loose should not go back into the device.
Use the correct replacement size and shape. A screen that is too small can move, while one that is too large can buckle or block the path. Generic screens are not always a match for a model-specific oven or cooling unit.
Check O-rings and other wear parts at the same time. Replace a seal if the maker’s guide calls for replacement when it is cracked, stretched, flattened, or no longer holds its position. Do not use glue or an improvised gasket inside the device.
- Replace a screen that stays dark after the approved cleaning method.
- Replace a screen that has hardened residue that brushing or permitted soaking will not remove.
- Replace a screen when airflow remains restricted after the rest of the vapor path is clean.
- Replace a screen that is bent, torn, frayed, loose, or unable to sit flat.
- Keep cleaning when the screen is intact and the buildup is loose, soft, and removable by the approved method.
| What you see | What to do |
|---|---|
| Loose residue on an intact screen | Brush or clean by the approved method |
| Hard, dark buildup remains | Replace with the correct screen |
| Airflow stays restricted | Inspect the full path, then replace the screen if it remains clogged |
| Mesh is bent, torn, or loose | Replace rather than reshaping it |
What Is a Vaporizer Burn-Off and When Should You Do It?
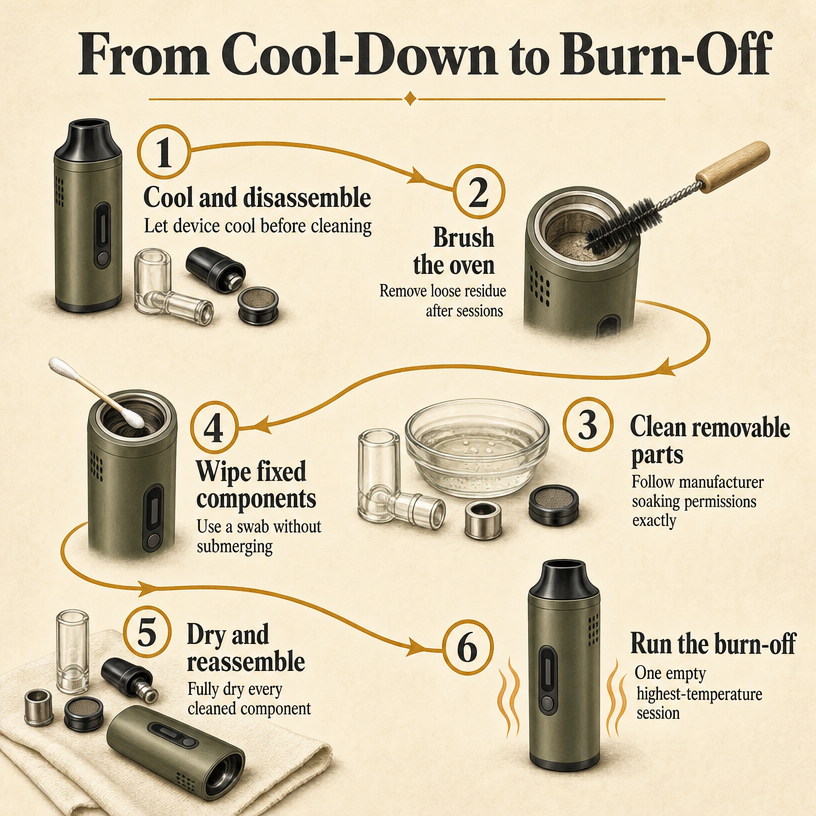
A burn-off is an empty heating session performed after cleaning. Its purpose is to help evaporate small traces of moisture or alcohol that may remain after the parts have already air-dried. It is not a replacement for drying.
XVAPE and Planet of the Vapes recommend running the empty device at its highest temperature for one full session after cleaned parts are dry and the device is reassembled. [2] [4]
Do a burn-off only when the manufacturer allows it. Some devices have model-specific limits, automatic shutoffs, or cleaning instructions that use a different setting. Follow those instructions instead of guessing at a time or temperature.
The device must be empty. Remove all material, confirm the oven is clear, and make sure every part is installed correctly. Put the vaporizer on a stable surface in a ventilated area, away from alcohol bottles and anything that can burn.
Let the unit cool after the session. If you still notice visible moisture or a strong alcohol smell, stop and let the device air out longer. Do not repeat heat cycles to rush drying or use the device until the issue is gone.
- Air-dry every approved cleaned part until no visible moisture remains.
- Reassemble the device exactly as the manufacturer directs and confirm the oven is empty.
- Move alcohol and other flammable materials away, then place the device in a ventilated area.
- If the maker recommends it, select the highest allowed setting and run one full empty session.
- Let the vaporizer cool, inspect it again, and wait longer if any moisture or strong alcohol odor remains.
Frequently Asked Questions
Can you soak a vaporizer mouthpiece in isopropyl alcohol?
Only if the manufacturer permits it for that exact mouthpiece and material. PAX allows its PAX 3 mouthpiece and concentrate insert to be cleaned with isopropyl alcohol or soapy water, but that permission does not apply to every vaporizer. [1]
What strength of isopropyl alcohol should you use on a vaporizer?
XVAPE specifies 91 to 99 percent isopropyl alcohol for compatible vaporizer parts. Apply it with a cotton swab or pipe cleaner, and keep it away from the heater and electronics. [2]
Can you soak vaporizer O-rings or plastic parts in alcohol?
How often should you deep-clean a dry herb vaporizer?
How can you tell when a vaporizer screen needs replacing?
Replace it when it remains dark, becomes hard, or restricts airflow after an approved cleaning. Also replace a screen that is bent, torn, frayed, or no longer fits flat. [2]
Why should you run a vaporizer empty after cleaning it?
How Can You Make Vaporizer Maintenance Easier?
The easiest cleaning job is the one you do before residue becomes hard. Let the oven cool, brush it after use, inspect the screen and mouthpiece, and plan a deeper cleaning when buildup appears or about once a week for frequent use.
Follow the manual as the final word. Use alcohol only on approved surfaces, soak only named removable parts, keep electronics and heat sources away from liquid, and allow full drying before reassembly. A few careful minutes can prevent the sort of cleaning shortcut that turns maintenance into a repair bill.
Sources
- PAX Labs: PAX 3 Vaporizer: Complete User Guide
- XVAPE USA: How to Maintain Your Portable Dry Herb Vaporizer for Peak Performance
- NIOSH / U.S. Centers for Disease Control and Prevention: Isopropyl alcohol – IDLH (Immediately Dangerous to Life or Health)
- Planet of the Vapes: How to Clean a Dry Herb Vaporizer
- VapeFully: How to clean a vaporizer? Tips and tools (2026)
- Cannabis Health News (reprinted from The Cannigma): How to clean your cannabis vaporiser