

Learning how to pack a bowl means loading ground dry herb into the bowl of a hand pipe, a chillum or one-hitter, or a bong’s bowl piece [2]. Build the pack in layers: a larger piece over the hole, a loose middle, and a lightly tamped top [7]. Fill to just below the rim, check the draw with a dry pull, and light one edge only [1].
What Does It Mean to Pack a Bowl?
Packing a bowl is the step where you load ground dry herb into the chamber that holds it: the bowl of a hand pipe (often called a spoon), the top of a chillum or one-hitter, or the removable bowl piece of a water pipe [2]. The pack sets the airflow, and airflow sets everything downstream. It decides how fast the material burns, how long the bowl lasts, and whether the burn stays even across the surface [1].
The word bowl causes more confusion than the technique does. It names the chamber itself, and it also gets used as shorthand for a whole glass pipe [9]. People say a bowl to mean one serving of ground herb as well [10]. None of those uses is wrong. Just be clear about which one you mean, because packing a bowl can mean loading a chamber or loading a single serving.
Where you are packing changes the shape of the job. A shallow spoon bowl, a deep bong slide, and a tiny one-hitter chamber all hold different amounts and take different pressure [10]. The steps below stay the same across all of them. Only the volume and the firmness of the tamp change.
Most beginners start with Hand Pipes or Bongs, and the loading motion is nearly identical on both. Water pipes come in a lot of shapes, and What Is a Recycler Bong and How Does It Work? covers one style you will see often. Whatever the piece, the goal never changes: get air moving evenly through the material.
- The chamber: the part of a pipe or bong that holds ground herb, plus the removable bowl piece on a water pipe [2].
- The whole device: casual shorthand for a glass pipe, the way someone might say pass the bowl [9].
- One serving: the amount of ground herb you load for a single session, usually described in grams [10].
- What the pack controls: airflow through the chamber, burn rate, how long the bowl lasts, and how evenly it burns [1].
- What the pack cannot fix: herb that was broken up unevenly, which no amount of tamping will correct [3].
How Fine Should You Grind Flower for a Bowl?
Grind consistency sets the ceiling on everything that follows. A medium grind is the target, and guides describe the right texture in kitchen terms: coarse salt, dried oregano, or coarse ground coffee [2] [5]. Pieces in that range are small enough to pack evenly and large enough to leave air gaps between them [3].
Too fine is the more common mistake. A fine grind compacts into a dense layer that restricts airflow, and the smallest particles get pulled through the hole into your mouth or down the stem [1]. Too coarse has the opposite problem. Chunks sit unevenly, air finds the loose spots, and you finish the session with usable material still sitting in the bowl [7].
If you are still choosing a piece, What Is the Best Smoking Piece for a Beginner? walks through the options, and What Is a Bong Bowl and How Do I Choose the Right One? breaks down how bowl pieces differ in size and joint fit. Uneven particle size causes trouble in rolled material too, and Why Does My Joint Burn Unevenly and How Do You Fix It? explains that pattern.
Moisture changes the result as well. Drier flower crumbles and grinds more consistently, while moist flower clumps and resists an even breakdown [3]. One guide suggests packing drier material looser and moist material finer and tighter. Either way, aim for pieces that are close to the same size before they go in the bowl [6].
- Too fine: packs into a dense layer, restricts airflow, and pulls through the hole into your mouth or the stem [1].
- Medium, the target: roughly coarse salt, dried oregano, or coarse ground coffee, or about 1 to 2mm pieces after two or three grinder rotations [3].
- Too coarse: uneven chunks leave gaps that air follows, so part of the bowl never gets hot [7].
- Hand-broken flower: produces inconsistent chunks and a less even burn than a grinder, because even particle size is what produces even airflow [5].
- Stems: remove large stems before packing, since they do not break down and they interrupt the pack [3].
| Grind | Texture | What It Does in the Bowl |
|---|---|---|
| Too fine | Powdery, like flour | Packs into a dense layer, restricts airflow, and pulls through the hole into your mouth or the stem [1] |
| Medium, the target | Coarse salt, dried oregano, or coarse ground coffee | Packs evenly and leaves air gaps between the pieces [3] |
| Too coarse | Chunky, uneven pieces | Air follows the loose spots, so part of the bowl never gets hot [7] |
| Hand-broken | Mixed chunks and dust | Inconsistent airflow and a less even burn than a grinder gives [5] |
How Tight Should You Pack a Bowl?
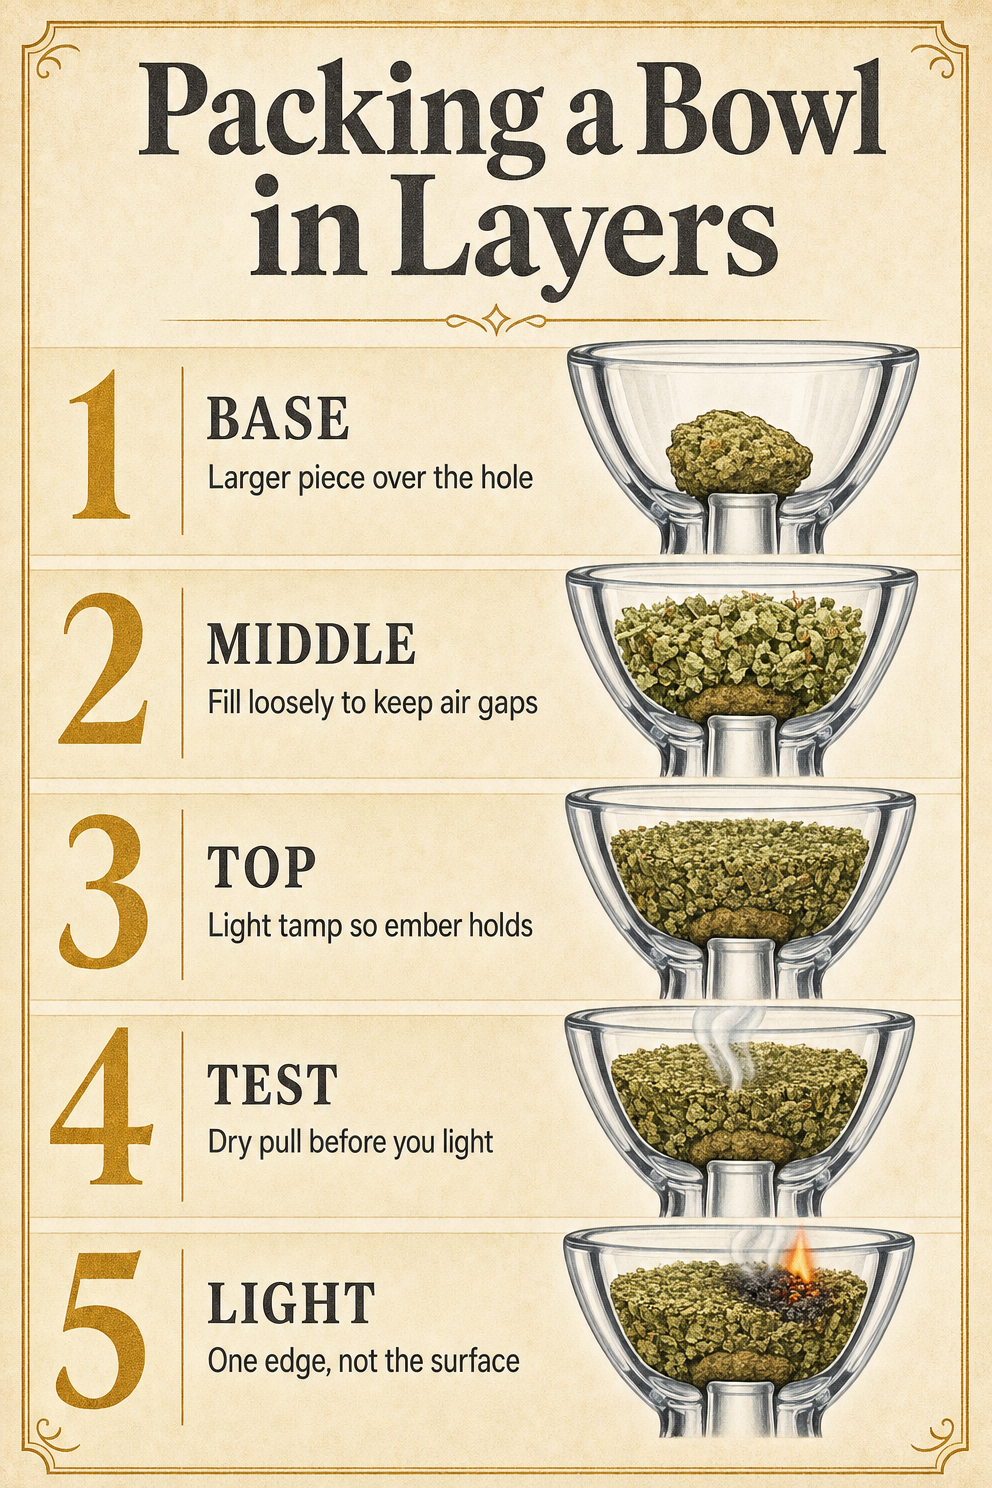
Build the bowl in layers rather than packing it all at once. The standard technique is a density gradient: looser at the bottom so air keeps moving through the hole, and slightly firmer at the top so the ember holds and travels across the surface [7]. Some guides call this a two-stage pack and others describe three layers. The naming varies. The principle does not [2].
The reason a gradient works is straightforward. Air takes the easiest path available, so a uniformly dense pack gives it nowhere to go except through whatever gap it can find, which is how a bowl ends up burning down one narrow channel [3]. Loose material in the middle keeps small gaps open across the whole width of the chamber instead [7].
Tamping is where beginners overdo it. Press once, gently, at the end, rather than pressing as you go [5]. A light tamp levels the surface and holds the material in place without squeezing the air out of it. If you use the flat end of a lighter or a tamper, let the weight of your hand do the work [4].
Concentrate pieces use a completely different loading approach, and E-Rig vs Traditional Dab Rig: Which Should You Choose? compares two common routes if you are curious how those work.
- Base layer: place a larger piece of flower over the hole so finer material cannot fall through. This acts as a natural screen [3].
- Middle layer: fill loosely. The goal is open air gaps rather than a solid block, so let the herb settle instead of pressing it down [7].
- Top layer: add finer material and press gently once. A lightly compacted surface holds the ember and gives the flame something to catch [2].
- Level it: use the flat end of a lighter or a tamper to even out the surface, and stop as soon as it is level [4].
- Leave room: the finished pack should sit just below the rim rather than mounded above it [5].
- Check the density: take a dry pull before lighting. If air moves freely, add one light tamp. If it feels blocked, loosen the pack with a poker [6].
How Much Flower Should You Put in a Bowl?
Published fill-level guidance does not agree with itself, which tells you there is no single right answer. One guide says fill the bowl flush with the rim after a light tamp [2]. Another suggests aiming for about 80% of the bowl capacity [4]. A third recommends filling loosely to just above the rim, then tamping until the herb sits just below it with a 1 to 2mm gap at the top [5]. A fourth suggests loading only about half the bowl for better airflow [6].
What all of that guidance shares is a hard limit at the top. Material sitting above the rim falls out or burns away before it reaches you, so overfilling wastes flower [5]. For a beginner, the partway fill is the more forgiving default, because it leaves the most room for air to move through the pack [6].
Capacity itself depends on the piece rather than on a fixed number. A small spoon bowl, a standard 14mm bowl, a large 18mm bowl, and a one-hitter each hold a different amount, and how firmly you pack changes the figure again [10]. Think of any gram count as a starting point, then adjust based on how the draw feels [4].
The same portion questions come up with Rolling Papers, where the amount is easier to see before you use it.
- Flush with the rim: fill the bowl, tamp lightly once, and level the surface at the top [2].
- About 80% of capacity: leave headroom so the top layer has somewhere to sit [4].
- Just below the rim: fill loosely to above the rim, tamp once, and finish with a 1 to 2mm gap at the top [5].
- About half a bowl: roughly 0.3 grams in a hand pipe, which leaves the most open airflow [6].
- Approximate capacity by piece: a small spoon bowl around 0.1 to 0.2 grams loose, a standard 14mm bowl around 0.2 to 0.4 grams, a large 18mm bowl around 0.4 to 0.6 grams, and a one-hitter around 0.05 to 0.1 grams [10].
- Bong bowls: commonly given as 0.2 to 0.5 grams, depending on the size of the piece [4].
| Fill Level | How You Do It | What It Is For |
|---|---|---|
| Flush with the rim | Fill the bowl, tamp lightly once, and level the surface | Keeps the top even so corner lighting works [2] |
| About 80% of capacity | Stop short and leave headroom above the pack | Gives the top layer somewhere to sit [4] |
| Just below the rim | Fill loosely above the rim, tamp once, leave a 1 to 2mm gap | Keeps the top layer clear of the flame [5] |
| About half a bowl | Load roughly 0.3 grams in a hand pipe | Leaves the most open airflow [6] |
How Do You Check a Bowl Before You Light It?
Two quick checks catch a bad pack before you spend any material. The first is the dry pull: draw on the piece with the carb covered if it has one, and pay attention to the resistance [4]. The second is a tilt test, which confirms the herb stays where you put it instead of sliding around inside the chamber [7].
The dry pull is the more informative of the two. Air should move with light to moderate resistance, like sipping through a straw [1]. No resistance at all means the pack is too loose, and the ember will not hold contact with the material around it. A blocked or hard pull means the pack is too tight, and you should loosen it with a poker or empty part of the bowl and start again [6].
While you are checking, look at the hole and the carb. If your bowl has a wide hole and you are using a fine grind, a base piece or a screen keeps material from being pulled through [3]. On a carbureted hand pipe, keep the herb clear of the carb hole so it does not interfere with airflow, and plan to cover the carb while you light and release it to clear the chamber [5].
- Look at the hole. If it is wide and your grind is fine, add a base piece or a screen before you fill [3].
- Check the fill level. The pack should sit just below the rim with a small gap at the top [5].
- Cover the carb, if your pipe has one, then take a slow dry pull [4].
- Read the resistance. Light to moderate, like a straw, means the pack is right. Free-flowing means it is too loose. Blocked means it is too tight [7].
- Fix what you found. Tamp lightly to firm up a loose pack, or loosen a tight one with a poker [6].
- Tilt the piece. The herb should stay in place rather than shifting to one side of the bowl [7].
- Clear the carb area. Keep material away from the carb hole so airflow is not blocked [5].
How Do You Light a Bowl So It Burns Evenly?
Corner lighting is the technique most guides name for an even burn. Instead of running the flame across the whole top, hold it to one edge of the packed surface and let the ember start there [2]. The untouched material stays unburned, which is what gives you a second and third pass at the bowl later [5].
Corner lighting is also the standard group etiquette. Each person lights a fresh edge rather than everyone drawing from a surface that has already been torched across the middle [4]. It takes a few more seconds per pass, and it keeps the bowl working longer for everyone sharing it.
When the ember holds without a flame, the bowl is cherried, a continuous burn that forms a glowing ember named for its resemblance to a red cherry [8]. Packing correctly is what allows a bowl to hold that ember instead of breaking the session into repeated relights [7]. Between hits, tap or stir the loose ash off the top so fresh material is exposed to the heat, and when the ember goes out, relight at the edge of what is left rather than across the whole surface [1].
- Cover the carb, if your pipe has one, and bring the flame to one edge of the pack [5].
- Draw slowly while the flame touches that edge. A hard, fast pull drags the ember straight down the middle [3].
- Release the carb to clear the chamber once the edge has caught [6].
- Stop when the edge is lit. Leave the rest of the surface untouched for the next pass [2].
- Tap or stir the ash between hits so fresh material is exposed underneath [1].
- Relight at the edge if the ember goes out, never across the whole top [5].
Does the Pipe or Bowl Change How You Pack It?
Packing follows the piece rather than one universal rule. Shallow hand pipe and spoon bowls take a modest load, and one guide puts that at about three-quarters full, while deeper bong bowls can take more material because the chamber is taller [1] [6]. One-hitters go the other direction. The chamber is tiny, so the pack is firm [6].
Material matters as much as shape. Wood bowls need gentler packing than thick glass, because the wood itself adds draw resistance, so a firm pack on top of that leaves you pulling against the piece [5]. Glass gives you a clearer view of the pack, which makes it easier to spot gaps or a dense pocket before you light.
Bowl pieces on water pipes add one more variable: joint size. A 10mm, 14mm, or 18mm joint holds a different amount, and some bowls have slits or a built-in glass screen instead of a single hole [10]. None of that changes the layering method. It only changes the volume you are filling [2].
- Hand pipes and spoons: a modest load, around three-quarters full, with a light tamp [1].
- Bong bowls: more material fits because the chamber is deeper, and the same layering still applies [6].
- One-hitters: pack firmly, because the chamber is so small that a loose pack leaves too little material to work with [6].
- Wood bowls: pack more gently than glass, since the material adds its own draw resistance [5].
- Sherlock shapes: layer and tamp rather than filling in one pass, because the bowl sits at an angle [6].
- Bowl pieces with slits or a built-in glass screen: no separate screen needed, since the hole is already screened [10].
| Piece | How Much to Load | Packing Note |
|---|---|---|
| Hand pipe or spoon | About three-quarters full | Light tamp, because the chamber is shallow [1] |
| Bong bowl | More material than a hand pipe takes | The same layering, just a larger volume [6] |
| One-hitter | A tiny chamber, packed firm | A loose pack leaves too little material to work with [6] |
| Wood bowl | A modest load | Pack more gently, since the material adds its own draw resistance [5] |
| Sherlock shape | Layered in stages | The bowl sits at an angle, so layer and tamp [6] |
Why Does Your Bowl Burn Down One Side or Keep Going Out?
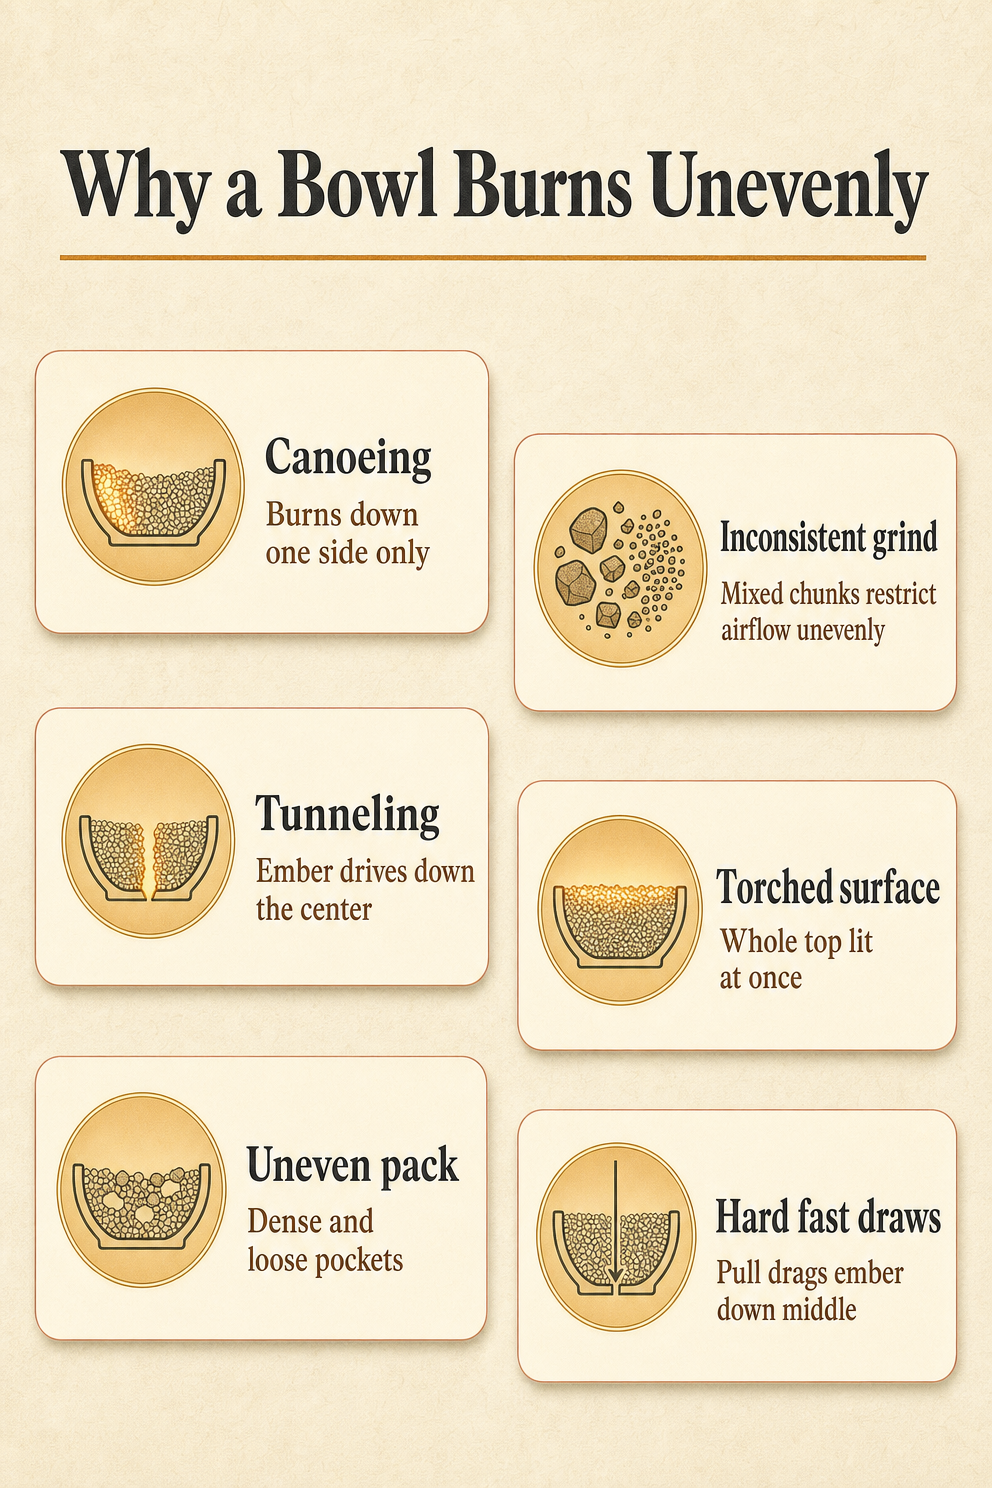
Uneven burning traces back to a short list of causes. Guides use canoeing for the pattern that burns down one side while the other stays green, and tunneling for the ember that drives straight down the center of the pack [3] [7]. Both usually come from the same handful of habits, and both are fixable.
The most common cause is uneven density. If one side of the bowl is packed tighter than the other, air follows the looser path and the ember goes with it [2]. An inconsistent grind produces the same result from the other direction. Mixed chunk sizes create dense and loose pockets inside a single pack, and air takes the easy route through them [5].
Lighting habits matter just as much. Always lighting the same spot, or torching the entire surface at once, removes the untouched material that would have kept the bowl going [4]. Hard, fast draws do the opposite kind of damage, pulling the ember down the middle instead of letting it spread across the top [7]. Moist flower adds to the problem, because it clumps, grinds less evenly, and often needs more relights than drier material [6]. Resin and ash buildup narrows the airway too, so a dirty bowl, a clogged screen, or residue in the downstem restricts airflow no matter how well you packed [1].
- Uneven density: check for a tight side and a loose side, then repack so the surface is level [2].
- Inconsistent grind: regrind to a medium consistency so the particles are close to the same size [5].
- Same-spot lighting: rotate where the flame touches the surface instead of returning to the same edge [3].
- Torched surface: light one edge only and leave the rest of the top unburned [4].
- Hard fast draws: slow the pull so the ember spreads across the top rather than drilling down [7].
- Moist flower: pack it finer and tighter, or let it dry longer, and expect more relights either way [6].
- Resin and ash buildup: tap ash out between bowls and clean the bowl, screen, downstem, and carb area regularly, so the draw reflects your pack rather than the buildup [1].
Frequently Asked Questions
Do you need a screen in a bowl?
Not always. Placing a larger piece of flower over the hole at the bottom of the bowl works as a natural screen and stops finer material from being pulled through. A brass, stainless steel, or glass screen is the alternative, and some bowls have a built-in glass screen or a small ridge that does the same job. If your bowl has a wide hole and you are using a fine grind, a screen or a base piece keeps the draw from pulling material through.
Why does my bowl keep going out between hits?
A bowl that keeps going out usually points to a pack problem or a moisture problem rather than anything wrong with the piece. Moister flower clumps, grinds less evenly, and often needs more relights than drier flower. A pack that is too loose lets the ember lose contact with the material around it. Relight at the edge of the remaining herb instead of the whole surface, which burns through the rest of the bowl faster.
Can you pack a bowl without a grinder?
You can, but hand-broken flower produces inconsistent chunks, and grind consistency comes before packing technique. Even particle size is what produces even airflow, and no packing method can fix herb that was broken up unevenly. If you are working without a grinder, break the flower down as small and as evenly as you can, then check the dry pull to see whether the pack needs adjusting before you light.
How much flower fits in a bowl?
Capacity is an approximation that depends on the piece and on how tightly you pack it, and published figures vary by source. A standard spoon pipe bowl is often given as roughly 0.15 to 0.25 grams, a bong bowl as 0.2 to 0.5 grams depending on size, and a one-hitter as 0.05 to 0.1 grams. Think of any number as a starting point, then adjust based on how the draw feels.
Should you pack the bowl full or only partway?
Partway is the more forgiving default for beginners, and some guides suggest loading about half the bowl for better airflow. Others recommend filling loosely to just above the rim, then tamping once until the herb sits just below the rim with a small gap at the top. What all the guidance agrees on is that overfilling above the rim wastes material that falls out or burns away before it can be used.
What Is the Easiest Way to Remember How to Pack a Bowl?
Build the bowl in layers, fill it to just below the rim, and take a dry pull before you light. If the air moves like a straw, you are ready. If it does not, fix the pack first, because that is faster than dealing with a bad burn later [7].
Then light one edge and leave the rest of the surface alone. That single habit does more for an even burn than any packing trick, because it keeps material available for the next pass [2]. Between hits, tap the ash off so fresh herb sits at the top of the bowl [1].
Start with a medium grind, keep your piece clean, and adjust for the piece you are loading rather than chasing one universal number [10]. If you are stocking up on glass, screens, or a grinder to go with your setup, Treehouse Lifestyle offers free shipping on orders $150+.
Sources
- Dank Geek: How to Pack a Bowl for a Smooth, Even Burn
- White Rhino Products: How to Pack a Bowl: A Beginner’s FAQ Guide (2026)
- MunchMakers: How To Pack A Bowl
- Cannabis Etiquette: How to Pack a Bowl — Pipe Loading Guide
- Daily High Club: How to Pack a Pipe Bowl Perfectly Every Time (Glass or Wood)
- Hemper: How to Pack a Bowl in a Hand Pipe
- DankStop: How to Pack a Bowl Like a Pro: Step-by-Step Technique Guide
- Leafly: What is cherried weed? | Cannabis Glossary
- Wikipedia: Bowl (smoking)
- CloverGlass: What Is a Bowl of Weed? Size, Packing & Glass Guide