

To roll a joint, grind the cannabis, set a crutch at one end of a 1 1/4 paper with the gummed edge up, spread about half a gram evenly along the crease, roll the paper into a cylinder, tuck the unglued edge, then moisten the gum line and press the seam shut. [1] Most people get a roll they are happy with within a few tries.
What Do You Need to Roll a Joint?
Four items cover the job, and none of them is complicated. The paper holds the fill, the crutch gives you a mouthpiece, the grinder evens out the material, and a flat tray gives you somewhere steady to work. A poker or a storage tube only makes the process tidier.
Start with a 1 1/4 paper and keep a spare pack. Paper weight matters more than people expect: most papers fall between about 12 and 30 GSM, and the ultra-thin end of that range tears easily in inexperienced hands. [8] Medium-weight papers in roughly the 21-30 GSM band are the more forgiving choice while you learn.
A crutch is optional, but it does real work. It keeps the end of the joint open, adds support so the roll stays straight, and blocks loose plant material from reaching your mouth. [4] You can buy them by the bag or fold your own from a strip of card. If you prefer plant-fiber paper, Hemp Rolling Papers behave the same way as any other paper of the same weight.
Stocking up is the cheapest way to practice. Buy a few packs of papers and a bag of crutches at once so you never run out mid-roll, and Treehouse offers free shipping on orders $150+.
- Rolling Papers: the wrap that holds the fill. A 1 1/4 size is the easiest to learn on, and a medium weight resists tearing better than a thin one.
- Filters / Tips: the mouthpiece. A crutch, filter, or tip keeps the end open, supports the roll, and keeps loose material out of your mouth. [4]
- A grinder: it breaks the cannabis into an even texture so the fill spreads along the paper instead of sitting in one lump. [1]
- A flat tray: it catches what falls and gives the paper a stable surface, which matters more than it sounds when both hands are busy.
How Much Cannabis Goes Into a Joint?
About half a gram is the usual starting fill for a 1 1/4 paper, and that is roughly half a store-bought pre-roll. [3] The amount is a preference plus a paper-size decision rather than a rule, and the paper sets the ceiling: half a gram in a king size paper leaves a thin, floppy roll, while a full gram in a 1 1/4 paper overfills it.
Research puts the real-world average lower than most people guess. A study that modelled 10,628 cannabis transactions estimated an average joint at about 0.32 grams. [7] Earlier estimates ran from 0.3 to 0.75 grams, with some people reporting up to a gram.
If you have not settled on a paper size yet, What Are Rolling Paper Sizes and Which One Should I Use? compares the common formats. What Rolling Accessories Do I Need and How Do I Choose the Right Ones? covers the tools that go with rolling, What Are Rolling Tips and Filters, and Which One Should You Use? explains crutch and tip options, and What Should I Look for When Buying a Weed Grinder? is worth a read before you buy a grinder.
- About a third of a gram: close to the 0.32-gram average from that transaction study, and enough for a short solo session. [7]
- About half a gram: the recommended starting fill for a 1 1/4 paper, and roughly half a store pre-roll. [3]
- About three quarters of a gram: a middle size that still fits a 1 1/4 paper if you spread it the full length.
- A full gram: the size most pre-rolls sold in stores come in, and it needs a king size paper or a cone to hold it. [3]
How Should You Prepare the Cannabis Before Rolling?
Prep decides more of the outcome than the rolling does. A joint that will not hold its shape is usually filled with uneven material, and a joint that runs down one side is usually filled with clumps.
A grinder gives you the most consistent texture, though clean fingers work for a first attempt. Aim for something like coarse sand or torn parsley: small enough to spread evenly, not so fine that it falls through the paper. [1]
Stems matter more than people expect. A stem punches through paper when you press down, and one stick can split a seam that was otherwise sealed. Pull them out before you grind, not after.
Work over the tray the whole time. Ground material is light, and the part that lands on the table is the part you will be short of when the paper is already half rolled.
- Break the buds down and pull out every stem and stick. Stems punch through the paper and make the roll hard to shape. [1]
- Grind, or break the material apart with your fingertips, until the texture is even. A consistent grind is easier to shape and keeps the roll even. [1]
- Loosen any clumps with your fingers. Clumps are what make a joint lumpy and cause it to burn down one side. [3]
- Spread the material into a loose, even pile on the tray, so you can lift it onto the paper in one motion instead of several handfuls.
How Do You Roll a Joint Step by Step?
This is the whole sequence, in order. Work on a flat surface with the paper in front of you and both hands free. The first two attempts usually come out loose or cone-shaped, which is normal and fixable.
Read the six steps below before you start. Keep your pressure even throughout, and once the seam is closed, stop adjusting: a slightly imperfect joint that stays together beats a reworked one that will not draw.
The two mistakes that ruin more first joints than anything else are over-rolling and over-wetting. Rolling and re-rolling the paper to chase the tuck compresses the fill, and a compressed fill makes the finished joint hard to draw. [3] Over-wetting the gum does the opposite kind of damage: it softens the paper so the seam slides instead of sticking.
If the tuck will not catch, do not keep rolling. Set the joint down, let the paper relax for a moment, then try once more with a lighter touch. If the paper has already creased badly, start again with a fresh one, because a crease folded twice will not sit flat against the gum.
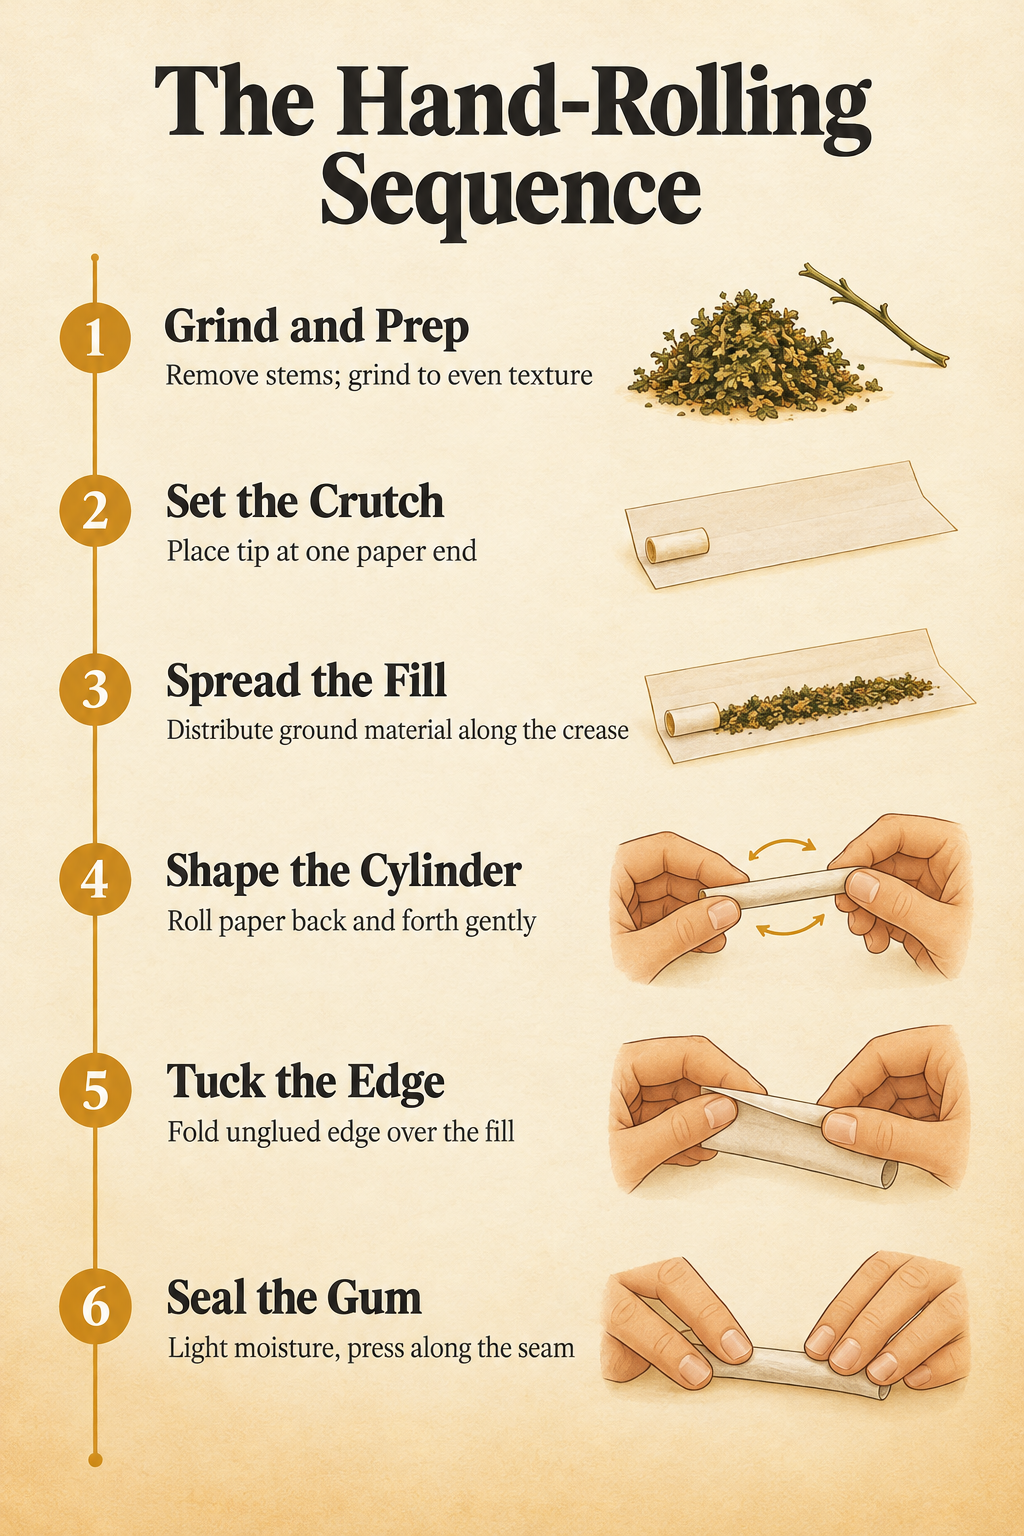
- Place the paper gum side up and facing you. The gummed strip should sit along the edge nearest your body. If the gum faces away, the roll will not seal on the tuck side. [1]
- Set the crutch at one end of the paper, sitting in the crease. Size it to the finished joint so it fills the end instead of rattling around inside it. [4]
- Spread the ground material evenly along the crease, from the crutch to the far end. Leave a little space at the far end and keep the layer flat rather than mounded in the middle. [1]
- Shape the fill with your fingers into a rough cylinder, then use both thumbs to roll the paper back and forth over it. Roll gently and let the paper wrap the material, because the goal is a tube rather than a bundle. [3]
- Tuck the unglued edge under the fill and roll it up and over. This is the step that takes practice: fold the paper down with your thumbs while your index fingers hold the shape of the tube. [5]
- Moisten the gum line lightly and press the seam shut, working from the crutch end to the tip. A small amount of moisture is enough, because too much softens the paper and the seam will not hold. [3] Once the seam is shut, tamp the open end with a pen or a chopstick so the fill sits even and the tip has a flat face, then twist the tip closed if you are not lighting it right away.
What Size Rolling Paper Should a Beginner Start With?
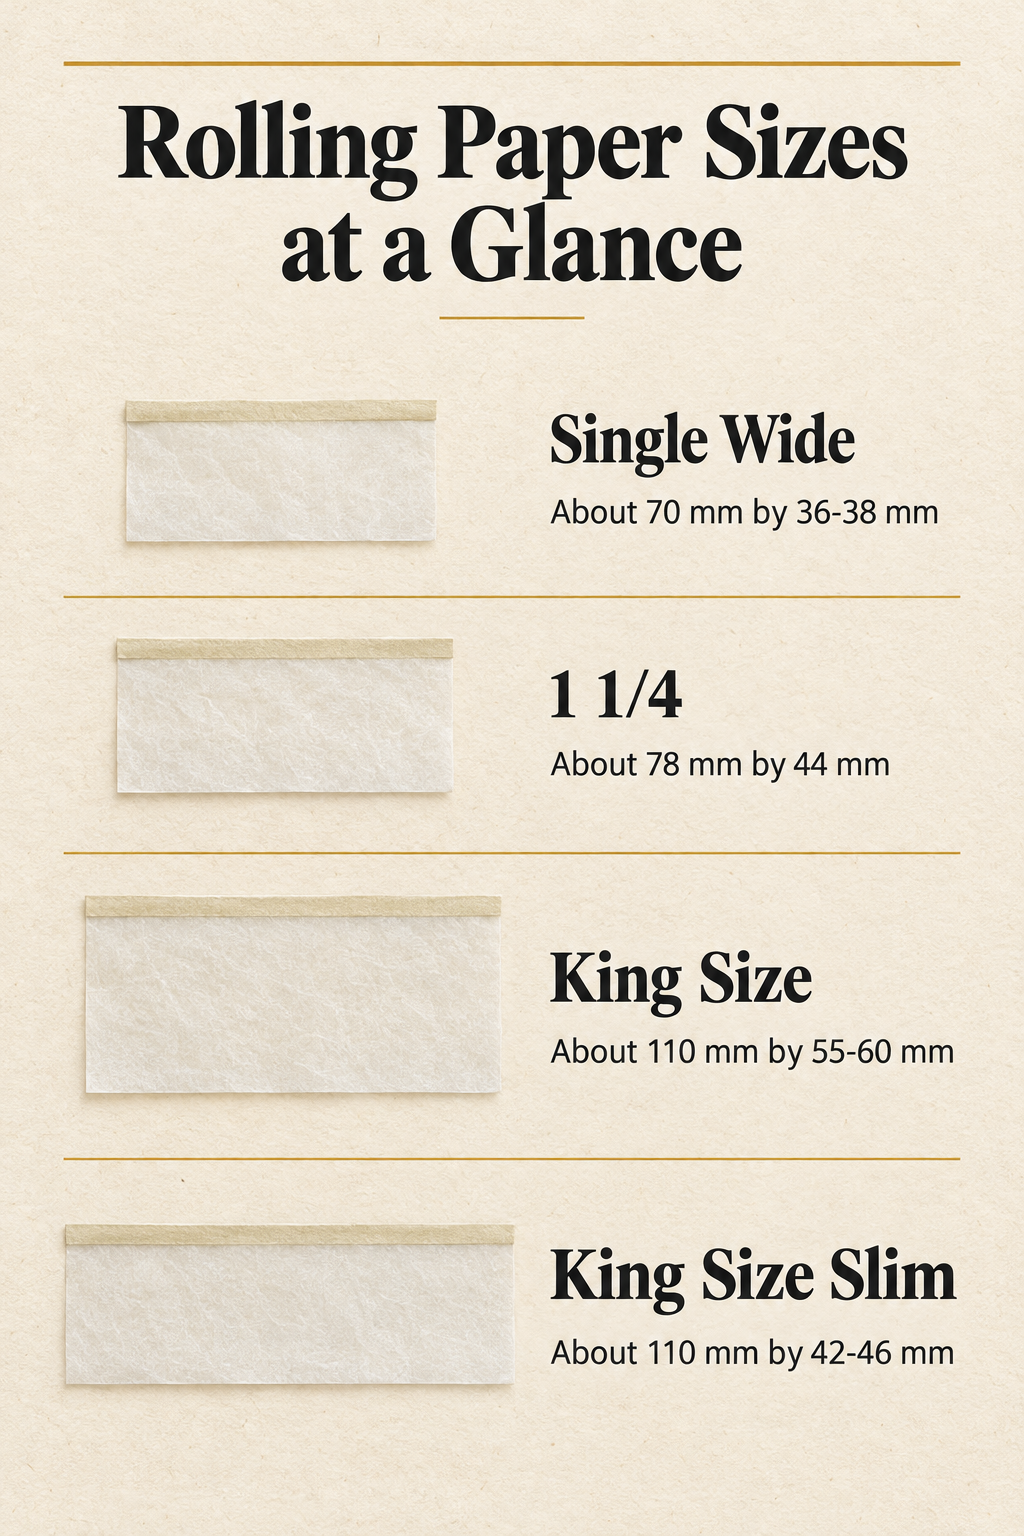
1 1/4 papers, at about 78 mm by 44 mm, are the format manufacturers most often point new rollers toward. They are neither too wide nor too long to handle, so there is less paper to chase during the tuck. [2]
Sizes are not standardised across brands, so two packs labelled with the same format name can differ by a few millimetres. Read the measurements on the packaging rather than trusting the label. [2]
Paper weight is the second variable and it matters as much as length. Ultra-thin papers in the 12-15 GSM band tear easily while you are learning, while medium-weight papers around 21-30 GSM are the more forgiving choice. [8] Moving down to a thinner paper is easy once your tuck is reliable; starting there is not, which is why slim formats are usually left until later. [3]
Length also changes how long the joint lasts. Longer papers generally burn more slowly and suit group sessions, while short papers are quicker to finish. [2]
- 1 1/4 first: at about 78 mm by 44 mm it gives you enough width to shape the fill and little enough length to control. [2]
- Medium weight over ultra-thin: the 21-30 GSM band is described as more forgiving, while 12-15 GSM paper tears easily in new hands. [8]
- Check the packaging, not the label: sizes are not standardised, so the printed millimetres are the reliable reference. [2]
- Size up for a longer session, not to fix a loose roll: king size suits sharing, and a longer paper does not correct an uneven fill. [2]
| Paper size | Typical dimensions | What it suits |
|---|---|---|
| Single wide | About 70 mm by 36-38 mm | A short roll, with little paper to tuck |
| 1 1/4 | About 78 mm by 44 mm | The easiest size for a first roll |
| 1 1/2 | About 78 mm by 60 mm | More material, but more paper to control |
| King size | About 110 mm by 55-60 mm | Sharing or a slow session |
| King size slim | About 110 mm by 42-46 mm | A thin roll with little margin on the tuck |
Why Does a Hand-Rolled Joint Come Out Loose or Uneven?
Most faults come from the fill, not the paper. Diagnose by feel: a joint that gives when you press it is loose, and one that feels solid as a pencil is packed too tight.
If the joint burns down one side or keeps going out, the fill is uneven. If it is hard to draw, the fill is compressed. Those two problems pull in opposite directions, which is why the target is an even fill that is firm but not squashed.
The same trade-off shows up in cones and machines, so the fixes carry over. Too tight a pack gives a hard pull, while too loose a pack burns unevenly. [9] A rolling machine hits the same wall when it is overfilled: it will not close cleanly and the paper tears. [10]
- Loose and floppy: too little material, or material spread unevenly. Add a little more ground cannabis and spread it the full length of the crease. [3]
- Hard to draw: the fill is compressed by over-rolling or by packing too much in. Use less material and roll the tube once rather than repeatedly. [3]
- Lumpy: clumps in the material. Re-grind it or break the clumps apart with your fingers before the paper goes down. [1]
- Seam will not stick: too much moisture on the gum. Use less, press the seam, and give it a moment before handling the joint. [3]
- Collapses near the mouth end: the crutch is too small for the roll. Use a wider crutch so it holds the round shape instead of sliding around. [4]
Are Pre-Rolled Cones or Rolling Machines Easier Than Hand Rolling?
All three routes end in the same object, and none of them wins on every measure. Cones and machines remove the tuck, which is the step most people struggle with. Freehand rolling keeps the most control over fill and shape.
Cones are papers already shaped and sealed with a built-in tip. You fill them with ground material and tamp in stages, so the fill settles evenly instead of trapping air. Pack too tight and the pull is hard; pack too loose and the burn is uneven. [9] A standard 1 1/4 cone fills more evenly than a party-size one while you are learning. [9]
A rolling machine works like a guided version of your hands. The paper goes in gum side up and facing you, the material is spread evenly rather than mounded, and you turn the roller at a steady pace before moistening the gum and sealing it. [10] Overfilling is the usual failure: the machine will not close cleanly and the paper tears.
- Freehand paper: the most control over fill and shape, the steepest learning curve, and no gear beyond papers and a crutch. [3]
- Pre-rolled cones: the least skill needed and the most consistent shape, with fill control limited to how you tamp. [9]
- Rolling machines: quicker and more even than freehand at the same paper size, but the material has to be spread before you close the roller. [10]
- Mixing methods: fill a cone when you want a guaranteed result, and keep a pack of papers on the side to practice the tuck.
| Method | Effort to learn | Consistency | Control over fill |
|---|---|---|---|
| Freehand paper | Highest | Varies with practice | Full control |
| Pre-rolled cone | Lowest | Most consistent shape | Set by how you tamp |
| Rolling machine | Low | Even at the same paper size | Set by how much you load |
What Is the Difference Between a Joint, a Spliff, and a Blunt?
The three names describe the wrap and the fill, not a different rolling method. A joint is cannabis rolled in paper with no tobacco, which is the format this whole guide covers. [6]
A spliff uses the same paper and the same steps, with tobacco added to the fill. A blunt uses a hollowed cigar or a heavy cigar-style wrap instead of thin paper, so the finished roll is thicker and the wrap is a different material. [6] The hand-rolling steps mostly carry over, though a blunt wrap is usually split, filled, and re-sealed rather than tucked the way paper is.
You will also see pre-rolled versions of the paper format in stores, sold as single joints or as two-packs of half-gram joints. [3] Those are the same object this guide teaches, just assembled before you buy it.
When you compare packs side by side, the wrap is the fastest way to tell them apart. Thin, slightly translucent paper means a joint or a spliff, while a thick leaf-style wrap means a blunt. The word joint is also used loosely for any cannabis roll, which is why the wrap is the more useful detail to check.
- Joint: cannabis in thin paper with no tobacco. This is the format this guide covers. [6]
- Spliff: cannabis plus tobacco in the same paper, rolled with the same steps. [6]
- Blunt: cannabis in a hollowed cigar or a cigar-style wrap, with no paper involved. [6]
- Pre-rolled: any of those formats bought already assembled, most commonly a one-gram joint or a two-pack of half-gram joints. [3]
| Roll type | Wrap | Tobacco in the fill |
|---|---|---|
| Joint | Thin rolling paper | None |
| Spliff | Thin rolling paper | Added |
| Blunt | Hollowed cigar or cigar-style wrap | Not added; the wrap itself is a cigar product |
Frequently Asked Questions
How much cannabis should a beginner put in a joint?
About half a gram is the common starting fill for a 1 1/4 paper. That is enough to roll a joint that holds its shape without being stuffed. Most pre-rolls sold in stores are a full gram, so half a gram is roughly half a store pre-roll. The amount is a preference and paper-size decision rather than a fixed rule, and a fuller paper simply makes a thicker joint.
Which side of the rolling paper goes up when you roll?
The gummed side goes up and faces you. The adhesive strip should sit along the edge nearest your body, so that once the paper is rolled into a cylinder the gum line is on the outside where you can moisten it and press the seam closed. Laying the paper gum side down is the most common reason a first roll will not seal.
Do you need a crutch to roll a joint?
No, a crutch is optional, but it makes the roll easier to manage. A crutch, also called a filter or a tip, works as a mouthpiece: it keeps the end of the joint open, adds structural support so the roll stays straight, and blocks loose plant material from reaching your mouth. Most crutches are a few accordion folds pressed flat and then rolled into a cylinder sized to the finished joint.
What size rolling paper is best for a first roll?
1 1/4 papers, at roughly 78 mm by 44 mm, are the size manufacturers most often recommend to new rollers, because they are neither too wide nor too long to handle. Longer formats such as king size suit sharing or slower sessions but give a beginner more paper to manage. Paper weight matters too: ultra-thin papers tear more easily, while medium-weight papers are described as the more forgiving choice.
Why is my hand-rolled joint hard to draw?
Over-rolling and over-packing are the usual causes. Rolling and re-rolling the paper to chase the tuck compresses the fill, and the same thing happens when material is packed too tightly into a cone or a machine. Too loose a fill causes the opposite problem, an uneven burn, so the target is an even fill that is firm but not compressed.
What Should You Practice First to Roll a Better Joint?
Practice the tuck, not the whole joint. Roll an empty paper around a crutch a few times until the motion feels familiar, then add material. Almost every problem in this guide gets easier once the tuck is reliable.
Start with 1 1/4 papers in a medium weight, about half a gram of evenly ground material, and a crutch sized to the roll. Keep the fill even, roll the tube once rather than repeatedly, and use as little moisture on the gum as will hold the seam. [3]
Expect the first few joints to be imperfect. Roll over a tray so you can reuse what falls out, and change one thing at a time: fill amount first, then paper size, then paper weight. That way you learn what each change actually does.
Sources
- Zig-Zag: Rolling 101: Techniques Every Beginner Should Know
- Zig-Zag: Why Size Matters: A Guide to Rolling Paper Dimensions
- Leafly: How to roll a joint in 7 easy steps
- Leafly: How to roll a filter or crutch for your joint or spliff
- wikiHow (co-authored by Aaron Justis, Buds & Roses): How to Roll a Joint or Blunt for Smoking Cannabis
- Weedmaps: How to roll a joint: Step-by-step guide
- University of Pennsylvania (Penn Today), reporting research by Greg Ridgeway and Beau Kilmer: How much marijuana does the average joint contain?
- Futurola: Best Paper Thickness for a Smooth Roll
- Futurola: How to Pack a Cone: A Beginner’s Guide
- OCB: How to use the OCB rolling machine step by step