

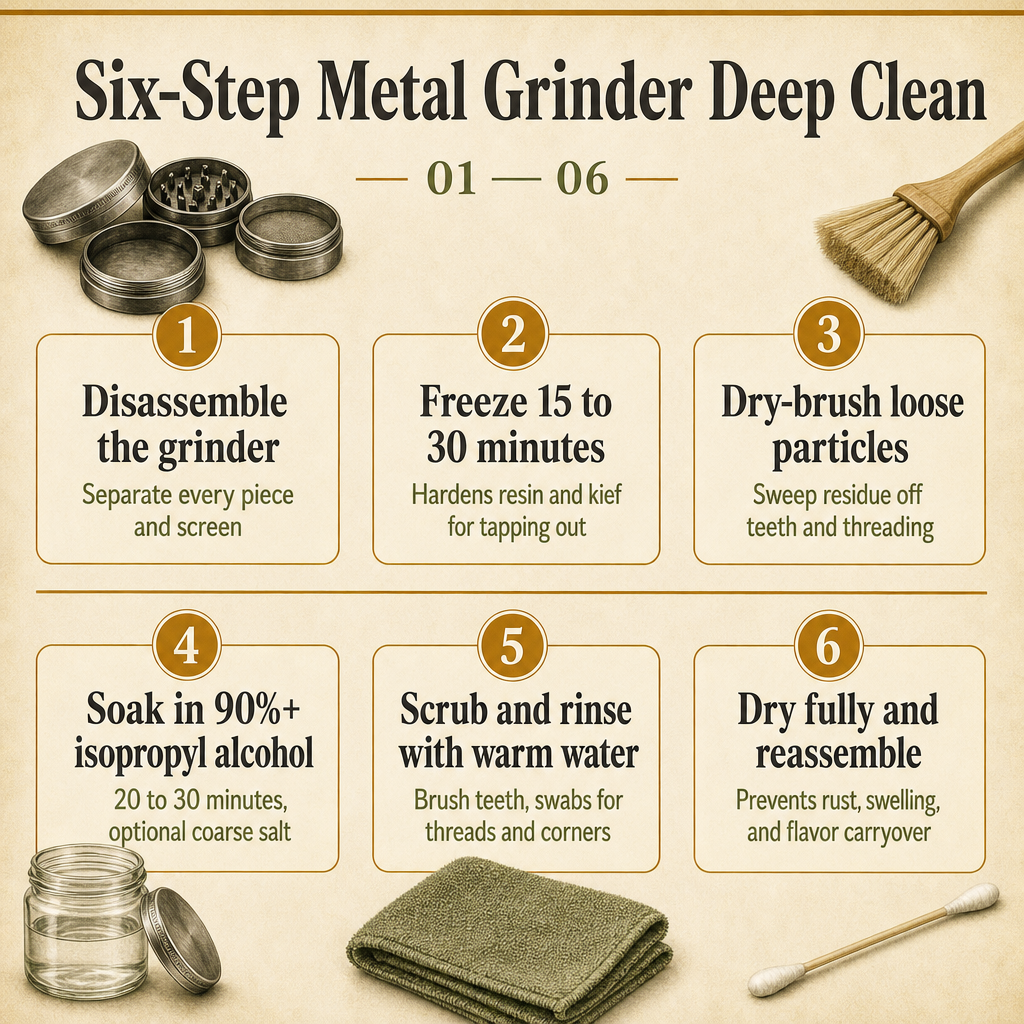
To clean a grinder, fully disassemble it and match the method to the material: soak metal parts in 90 percent or higher isopropyl alcohol for about 20 to 30 minutes, wash plastic in warm water with dish soap, and dry-brush wood. Freeze it for 15 to 30 minutes so resin hardens, tap out kief, then scrub, rinse, and dry every part. [2] [3] [4]
What Are the Different Types of Grinders and Materials You Can Clean?
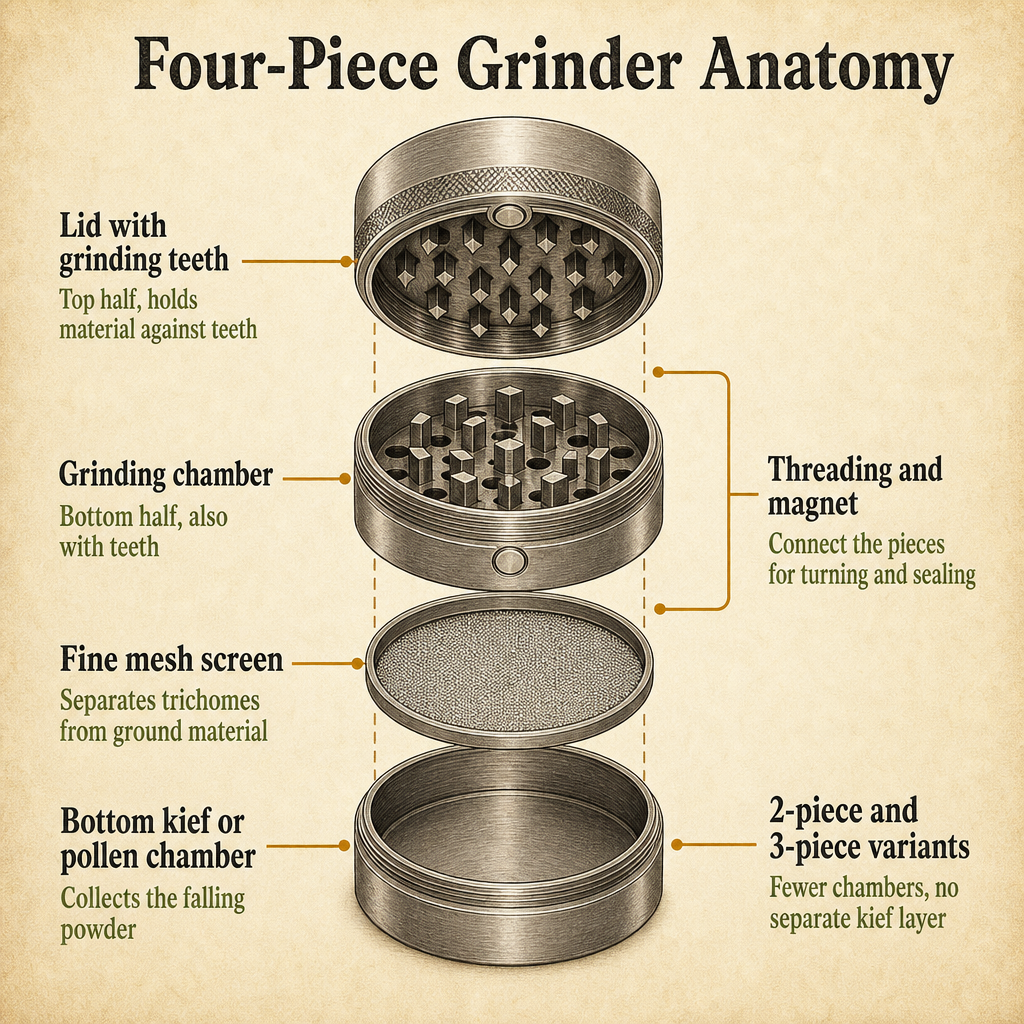
Grinders come in three common layouts: 2-piece, 3-piece, and 4-piece designs. A 2-piece grinder is a magnetic lid on top of a single grinding chamber, so the ground material stays in the same chamber where it was loaded. [1] A 4-piece grinder adds a screen layer and a lower collection chamber, so fine particles drop through the mesh into their own compartment while the coarser grind stays above the screen. [5] A 3-piece grinder sits in between, with a screen layer but no separate bottom chamber. The more pieces a grinder has, the more parts and screens you have to handle when cleaning, even though the basic routine is the same from design to design.
Three material families cover almost every grinder on the market: wood, plastic, and metal. Each material reacts differently to water and to isopropyl alcohol, so the cleaning method is set by the material, not by the piece count. [3] Plastic and acrylic grinders should not be soaked in alcohol because the alcohol can cloud, craze, or weaken the plastic over time. [4] Wooden grinders should not be soaked in either water or alcohol — water causes the wood to swell and alcohol strips the finish. [3] Metal grinders handle an alcohol soak well, which is why the soak-and-scrub method is the standard for stainless steel and aluminum.
Among metal grinders, there are three common sub-types to know. Zinc is the cheapest, aluminum is the most common, and stainless steel is the most durable. [1] Aluminum grinders are often made from alloys 6061 or 6063 and may be anodized for additional strength, while stainless steel grinders are commonly machined from grade 303 or 304 steel. [1] Both respond to the same alcohol-soak routine, so once you have confirmed your grinder is metal, you can follow the same steps regardless of which alloy it is. Browse our Grinders collection and Cleaning Supplies page to see the range of materials and matching maintenance tools in one place.
- 2-piece grinder: magnetic lid plus a single grinding chamber, with the ground material staying in the same chamber where it was loaded [1]
- 3-piece grinder: adds a screen layer between the grinding chamber and a closed bottom, so fine particles collect on the screen but not in a separate chamber [5]
- 4-piece grinder: full screen layer plus a separate lower collection chamber for fine particles, often called a kief catcher or pollen catcher [1]
- Wood material: dry brush only after every use, gentle scrape with the manufacturer’s plastic scraper when needed, no water or alcohol [3]
- Plastic and acrylic material: warm water with a small amount of dish soap and a soft brush, no alcohol soak, no prolonged hot water [4]
- Metal material (zinc, aluminum, stainless steel): 90 percent or higher isopropyl alcohol soak for 20 to 30 minutes, optional coarse salt as a mild abrasive [2]
| Grinder type | Parts to clean | Material rule |
|---|---|---|
| 2-piece | Magnetic lid and one grinding chamber | Method set by material, not piece count |
| 3-piece | Lid, grinding chamber, and a screen layer without a separate collection chamber | Method set by material, not piece count |
| 4-piece | Lid, grinding chamber, screen, and a separate kief or pollen catcher chamber | Method set by material, not piece count |
| Wood | Same parts as the design above | Dry brush only, no water or alcohol |
| Plastic or acrylic | Same parts as the design above | Warm water and dish soap, no alcohol soak |
| Metal (zinc, aluminum, stainless steel) | Same parts as the design above | 90 percent or higher isopropyl alcohol soak |
What Tools and Supplies Do You Need to Clean a Grinder?
Cleaning a grinder is faster when the right tools are already on the counter. A small kit covers every grinder type and every routine clean, so you do not have to stop mid-clean to hunt for a cotton swab. [4] Specialist guides also point to a zip-top bag as a handy vessel for shake-and-soak cleans on metal grinders, since you can drop the parts in with alcohol and salt, seal the bag, and shake gently to work grime loose from the teeth and threading. [4] A The Complete Guide to Cleaning Smoking Accessories covers the broader routine if you want to round out the kit with pipe and bong cleaning tools at the same time.
Cotton swabs and toothpicks are your detail tools for the places a brush cannot reach. Cotton swabs work well for threading, the corners around the screen, and the inside of the kief chamber on a 4-piece grinder. [4] Toothpicks and tweezers help lift stuck particles off the screen mesh without bending or tearing it. A microfiber cloth is the gentlest option for drying every part before reassembly, since lint-free cloths avoid leaving fibers on a freshly cleaned surface. [4]
Before any wet clean, identify the cleaning liquid for the material. Metal parts use 90 percent or higher isopropyl alcohol because lower concentrations are too diluted with water to dissolve resin well. [7] Plastic and acrylic parts use warm water with a small amount of dish soap, never alcohol. Wood parts use no liquid at all. If you want a single useful reference for routine cleaning across grinder materials, our What Should I Look for When Buying a Weed Grinder? also covers the materials and matching cleaning approach. For shoppers who want to round out a kit with a sturdy accessory, the SILICONE BEAKER BONG WITH REMOVABLE GLASS BOWL is one of the pieces that benefits from the same kind of cleaning routine.
- Firm-bristled brush and a separate toothbrush: sweeps residue off teeth, threading, and the inside of the grinding chamber [4]
- Cotton swabs and toothpicks: detail tools for threading, screen corners, and the inside of the kief chamber [4]
- Tweezers and a microfiber cloth: tweezers lift stuck particles off the screen; the cloth dries every part without leaving lint [4]
- Isopropyl alcohol at 90 percent or higher, plus a coarse salt such as kosher or sea salt: the standard metal soak with a mild abrasive [2]
- Warm water and a small amount of dish soap: the right liquid for plastic and acrylic grinders, used with a soft brush [3]
- Zip-top bag: a sealed vessel for shake-and-soak cleans on metal parts, with alcohol and salt added inside [4]
How Do You Deep-Clean a Metal Grinder Step by Step?
The canonical metal grinder routine is the same routine that specialist publications and grinder makers tend to recommend, and it works on stainless steel and aluminum alike. [2] The full six-step sequence is: disassemble the grinder, freeze the parts for 15 to 30 minutes so resin hardens, dry-brush loose particles, soak the metal parts in 90 percent or higher isopropyl alcohol for 20 to 30 minutes (optionally with coarse salt), scrub residue with a brush or cotton swab, rinse with warm water, dry every piece thoroughly, and reassemble only when nothing is damp. [3] Walking through the steps in order is what keeps the clean effective and prevents the sticky residue from smearing back onto parts you have already cleaned.
Disassembly is the first step because cleaning pieces separately is faster and more thorough than trying to clean the grinder while it is still together. Unscrew the lid, the grinding chamber, the screen layer, and the lower collection chamber on a 4-piece grinder, and lay every part out on a clean surface. [4] Once the parts are separated, place the metal pieces in a zip-top bag or a small container and put them in the freezer for 15 to 30 minutes. The cold hardens sticky resin so it cracks off instead of smearing, and the same chill hardens any kief in the screen chamber so it can be tapped out and saved before the wet clean. [2]
After the freezer stint, take the parts out and tap them firmly against a sheet of paper or a small tray to knock loose any hardened resin and any kief. Dry-brush with a firm-bristled brush or a clean toothbrush to sweep off the residue you just loosened; the goal at this stage is to remove as much dry material as possible before adding any liquid. [4] Place the brushed parts in a zip-top bag or a small container, pour in enough 90 percent or higher isopropyl alcohol to cover them, and add a small amount of coarse salt as a mild abrasive. [7] Let the parts soak for 20 to 30 minutes; this is the step that actually dissolves the resin that brushing alone cannot lift.
Once the soak is done, pull the parts out and scrub the teeth, threading, and screen with a brush or cotton swab. For a 4-piece grinder, work carefully around the screen mesh so the brush does not stretch or tear it. [4] For a more thorough scrub, seal the parts back in the zip-top bag with the alcohol and salt and shake gently for a minute or two — the salt acts as a mild abrasive that helps lift grime from the teeth and threading. [2] When scrubbing is done, rinse every metal part with warm water to wash away the alcohol and any loosened residue. Dry every piece thoroughly with a microfiber cloth or by air drying on a clean towel, because trapped moisture can lead to rust on steel grinders and clumps or flavor carryover in the next session. [2] Reassemble only when nothing is damp.
If you would like a companion read on a related deep-clean routine, our How Do You Clean a Dab Rig and Keep It Working Well? walks through the same alcohol-and-salt logic for a different shape, and the steps translate easily if you also own a glass piece to maintain.
- Disassemble the grinder fully: separate the lid, the grinding chamber, the screen layer, and the lower collection chamber on a 4-piece design, and lay the parts on a clean surface [4]
- Freeze the parts for 15 to 30 minutes: the cold hardens resin so it cracks off instead of smearing, and it firms up any kief in the screen so it can be tapped out first [2]
- Tap and dry-brush: knock the parts against a sheet of paper to loosen hardened resin, then sweep residue off the teeth and threading with a firm-bristled brush [4]
- Soak in 90 percent or higher isopropyl alcohol for 20 to 30 minutes, with an optional pinch of coarse salt added as a mild abrasive for stubborn grime [7]
- Scrub and rinse: brush the teeth, run cotton swabs along the threading and screen corners, then rinse every metal part with warm water to wash away alcohol and residue [2]
- Dry fully and reassemble: air dry or wipe with a microfiber cloth so no moisture is trapped, then put the grinder back together and do a dry twist to confirm the parts move smoothly [3]
How Do You Clean Plastic and Wooden Grinders Safely?
Plastic and wooden grinders cannot take an alcohol soak, so the cleaning routine is different from the metal routine and the two materials are handled differently from each other. [3] Even within the plastic family, the rule is the same: warm water with a small amount of dish soap and a soft brush, never isopropyl alcohol, because alcohol can cloud, craze, or weaken the plastic over time. [4] Within the wood family, the rule is even stricter: dry brush only, never water and never alcohol, because water causes the wood to swell and alcohol strips the finish. [3] Matching the method to the material is what prevents a clean from turning into damage.
For plastic and acrylic grinders, start by disassembling the grinder and dry-brushing the loose particles off the teeth and threading. Then wash the parts in warm water with a small amount of dish soap, using a soft brush to scrub the residue. [3] Avoid prolonged exposure to hot water because cheap plastic can warp under heat. [4] Once the parts are clean, rinse them with warm water and dry them thoroughly with a microfiber cloth or by air drying on a clean towel. Reassemble only when nothing is damp; trapped moisture in the threading or on the screen can cause clumping and flavor carryover in the next session.
Wooden grinders stay dry-only throughout their life. After every use, brush the grinder with a soft brush to remove loose particles, and avoid any contact with water or alcohol because both will damage the wood. [3] For sticky resin that brushing alone does not lift, scrape gently with the plastic scraper the manufacturer included with the grinder, or use a soft plastic tool that will not gouge the surface. Once resin has stained the wood, the grinder cannot be restored to a brand-new appearance — the staining is permanent, and the cleaning goal is to keep the grinder functional rather than to make it look new. [3] If you want a related cleaning walkthrough for a different material, our How Do You Clean a Bong the Right Way? covers routine glass care with the same emphasis on matching the method to the material.
- Plastic and acrylic: dry-brush the loose particles first, then wash in warm water with a small amount of dish soap and a soft brush [3]
- Plastic and acrylic: avoid alcohol because it can cloud, craze, or weaken the plastic over time, and avoid prolonged hot water that can warp cheap plastic [4]
- Plastic and acrylic: rinse with warm water, dry every part thoroughly with a microfiber cloth, and reassemble only when nothing is damp
- Wood: dry brush after every use to remove loose particles, and never use water or alcohol because both damage the wood [3]
- Wood: for sticky residue, scrape gently with the manufacturer’s plastic scraper or a soft plastic tool that will not gouge the surface
- Wood: accept that once resin stains the wood, the grinder cannot return to a brand-new appearance — keep it functional rather than try to restore the finish [3]
| Step | Plastic or acrylic | Wood |
|---|---|---|
| Pre-clean | Dry-brush loose particles off teeth and threading | Dry-brush loose particles after every use |
| Liquid | Warm water with a small amount of dish soap | None — water and alcohol both damage wood |
| Tool | Soft brush | Manufacturer’s plastic scraper or a soft plastic tool |
| Avoid | Alcohol soaks and prolonged hot water that can warp plastic | Any contact with water or alcohol that swells the wood or strips the finish |
| Restore to new | Not applicable — surface scratches are cosmetic only | Not possible — resin stains on wood are permanent |
How Do You Save and Reuse Kief From the Grinder Screen?
On a 4-piece grinder, the fine mesh screen separates trichomes — also called kief — from the ground material and funnels them into the bottom chamber. [1] That bottom chamber has more than one name: some people call it a kief catcher, others call it a pollen catcher, and the powder itself is referred to as kief in some communities and pollen in others. [7] Either way, the screen is the part that does the separating work, and the chamber below it is where the fine particles collect. If you want to save that powder rather than rinse it down the drain, the timing of the capture step matters more than the cleaning method.
The capture step happens before the wet clean, not after. Tap or scoop the kief from the bottom chamber first, before any wet clean starts, so it is not washed into the rinse water. [5] The 15 to 30 minute freezer stint that hardens resin also hardens any kief sitting in the screen, which makes it easier to tap out and save. [2] Some users tap the grinder firmly against a sheet of paper after the freezer stint to knock the cold-firmed kief loose from the screen and into the bottom chamber, then scoop the powder onto a small tray or fold the paper and store it for later.
Capturing the kief before the wet clean is the practical safeguard. Once the metal parts go into the alcohol soak, the powder in the bottom chamber is at risk of being washed away with the resin, salt, and rinse water. [3] A small container with a lid, a piece of parchment, or a folded sheet of paper all work for short-term storage. If you want to keep the kief separate from the rest of your kit through the clean, set the saved container aside before you start the alcohol soak and only bring it back in once the grinder is reassembled and dry. For a broader look at how a different accessory separates material, our What Is a Recycler Bong and How Does It Work? is a useful companion read for the underlying separation idea.
- Identify the bottom chamber on a 4-piece grinder as the kief or pollen catcher, and identify the screen layer above it as the part that does the separating work [1]
- Capture the kief before any wet clean: tap the grinder against a sheet of paper and scoop the powder into a small container or fold the paper for storage [5]
- Use the freezer step to help: a 15 to 30 minute stint firms up the kief in the screen so it releases more cleanly when you tap the grinder out [2]
- Keep the saved container aside through the alcohol soak and rinse so the powder is not washed into the wet clean by accident [3]
- Store the saved powder in a small lidded container or a folded sheet of paper until you are ready to use it, and reassemble the grinder only once every part is dry
How Do You Use Isopropyl Alcohol Safely While Cleaning?
Isopropyl alcohol is the most effective solvent for grinder residue, but it is a flammable Class IB solvent and deserves a few safety steps every time you use it. [6] The documented lower explosive limit for isopropyl alcohol in air is 2.0 percent, which is roughly 2,000 parts per million, so the safety framing from government sources is straightforward: keep adequate ventilation and stay away from open flames while you are working. [6] The good news is that the routine is short and small in scale — a 20 to 30 minute soak in a sealed zip-top bag is the standard, and the bag itself keeps vapors contained even with the fridge door open.
Pick the right concentration as the first safety step. 91 percent or higher is what specialist guides recommend, because lower concentrations are too diluted with water to dissolve resin effectively. [2] Higher concentration also means less water inside the soak, which is a small bonus for metal parts since you are not leaving them sitting in water for any longer than needed. Pour the alcohol into the bag or container rather than carrying an open bottle around the workspace, and reseal the bottle as soon as you have poured what you need. Wipe up any spills on the counter before they evaporate into the room air.
Apply the alcohol with cotton swabs and brushes rather than pouring it directly over the grinder, and never pour it near an open flame, a hot stovetop, or a cigarette. [7] Keep the workspace ventilated — a window cracked open or a small fan pulling air across the workspace is enough for the small volumes used in a routine clean. Once the soak is done, rinse every metal part with warm water to remove the alcohol residue, and dry every piece thoroughly before reassembly. [3] Trapped alcohol residue in the next session can affect flavor and can leave clumps where the wet residue dries onto the teeth.
- Keep adequate ventilation: crack a window or run a small fan while the alcohol soak is in progress, and never work near an open flame [6]
- Use 91 percent or higher isopropyl alcohol: lower concentrations are too diluted with water to dissolve resin, which means more scrubbing and less effective cleaning [2]
- Apply with swabs and brushes rather than pouring, reseal the bottle as soon as you have poured what you need, and wipe up any spills right away [7]
- Stay away from open flames, hot stovetops, and cigarettes while the alcohol is in use, and never use alcohol in a closed room without airflow [6]
- Rinse every metal part with warm water after the soak so alcohol residue does not carry into the next session, and dry every piece before reassembly [3]
When Should You Replace a Grinder Instead of Cleaning It?
Not every grinder problem is a cleaning problem. Some wear items are signals that cleaning will not restore performance and the grinder should be replaced, while other signs are cosmetic and can be left alone. [3] The fastest way to tell the difference is to look at the parts that actually do the work: the teeth, the threading, the screen, the magnet, and the body of the chamber. [4] If any of those parts are damaged, cleaning will not undo the damage. If they are intact and the grinder is just sticky, a deeper clean is usually the right answer.
Replacement signals are the ones that affect how the grinder works. Bent teeth, stripped threading, a torn or sagging screen, a weak magnet, or a cracked plastic chamber are all signs that the grinder has reached the end of its useful life. [4] Once the teeth are bent, the grinder cannot produce a consistent grind. Once the threading is stripped, the lid or the chamber will not stay closed during use. Once the screen is torn, fine particles will fall through into the main grind instead of collecting in the bottom chamber. Once the magnet is weak, the lid pops off mid-twist. Once the plastic chamber is cracked, the grinder cannot be safely used at all.
Cosmetic wear is a different category. Minor discoloration on metal is cosmetic and does not, on its own, require replacement. [3] Light staining on a wooden grinder is permanent and likewise does not change how the grinder works. The practical checklist is to focus on the parts that affect function — teeth, threading, screen, magnet, and chamber condition — and to leave cosmetic discoloration alone unless the look bothers you. If the symptoms show up before any of those wear items, the fix is usually a deeper clean rather than a new grinder: residue on the teeth and threading causes the grinder to stick and become hard to turn, makes grinds uneven and clumpy, and can affect flavor if old residue is left in place. [2]
- Bent teeth: a replacement signal, since cleaning cannot restore a tooth that has been bent out of alignment [4]
- Stripped threading: a replacement signal, since the lid or chamber will no longer stay closed during use
- Torn or sagging screen: a replacement signal, since fine particles will no longer collect in the bottom chamber on their own [4]
- Weak magnet: a replacement signal, since the lid will pop off mid-twist and the grinder will not hold together
- Cracked plastic chamber: a replacement signal, since the structure of the grinder is no longer sound [3]
- Minor discoloration on metal or light staining on wood: cosmetic only, and not a reason to replace the grinder on its own [3]
| What you see | Clean or replace | Why |
|---|---|---|
| Residue on teeth and threading | Clean | A deeper routine restores smooth turning and consistent grind |
| Sticky screen | Clean | Freeze, tap, and brush; soak metal screens or wash plastic ones by material |
| Bent teeth | Replace | Cleaning cannot realign a tooth that is bent out of position |
| Stripped threading | Replace | Lid or chamber will not stay closed during use |
| Torn or sagging screen | Replace | Fine particles will no longer collect in the bottom chamber |
| Weak magnet | Replace | Lid pops off mid-twist and the grinder will not hold together |
| Cracked plastic chamber | Replace | The grinder structure is no longer sound |
| Minor discoloration on metal or light staining on wood | Clean or leave alone | Cosmetic only; does not affect how the grinder works |
Frequently Asked Questions
How often should you clean a grinder?
Specialist guides suggest brushing out the grinder between sessions and doing a deeper disassemble-and-soak clean roughly every two to four weeks for regular users. Clean the grinder before long-term storage as well, so residue does not collect dust and odors in warm, humid conditions. [2]
What is the best way to clean a metal grinder?
Fully disassemble the grinder, dry-brush loose particles, soak the metal parts in 90 percent or higher isopropyl alcohol for 20 to 30 minutes, scrub residue with a toothbrush or cotton swab, rinse with warm water, and dry thoroughly before reassembly. Adding coarse salt to the soak acts as a mild abrasive for stubborn grime. [2]
Is isopropyl alcohol safe to use on grinders, and what concentration should you use?
Yes, on metal grinders only, at 91 percent or higher. Lower concentrations are too diluted with water to dissolve resin well, and isopropyl alcohol is a flammable solvent, so work in a ventilated area away from open flames. [6]
How do you clean a plastic or wooden grinder?
Plastic and acrylic grinders should not be soaked in alcohol; clean them with warm water and a small amount of dish soap using a soft brush, and avoid prolonged hot-water exposure that can warp cheap plastic. Wooden grinders cannot be soaked in either water or alcohol; dry-brush after every use and scrape gently with the manufacturer’s plastic scraper when needed. [3]
How do you clean a 4-piece grinder without losing kief down the drain?
Tap or scoop the kief from the bottom chamber first, before any wet clean. A 15 to 30 minute stint in the freezer hardens the kief in the screen and makes it easier to tap out and save, then you can proceed with the rest of the deep clean. [2]
When is a grinder too worn to clean and should be replaced?
Replace the grinder when you see bent teeth, stripped threading, a torn or sagging screen, a weak magnet, or a cracked plastic chamber. Minor discoloration on metal is cosmetic and does not, by itself, require replacement. [4]
How Should You Build a Grinder Cleaning Routine That Lasts?
A grinder cleaning routine works best when it is matched to the material and kept simple. Identify the grinder, then follow the routine that applies: metal gets a 20 to 30 minute alcohol soak with a brush and optional salt, plastic gets warm water and dish soap with a soft brush, and wood stays dry-only with a brush and a gentle scraper. [3] Before any wet clean, freeze the grinder for 15 to 30 minutes so resin hardens and kief can be tapped out and saved. [2] A quick brush-out between sessions and a deeper clean every two to four weeks keeps residue from building up and the grinder turning smoothly. [4]
The right tools turn the routine from a chore into a five-minute job. A firm-bristled brush, a toothbrush, cotton swabs, toothpicks, tweezers, a microfiber cloth, and a zip-top bag for the shake-and-soak cover every grinder type. [4] Isopropyl alcohol at 91 percent or higher is reserved for metal parts, used with adequate ventilation and no open flames. [6] Every piece is dried thoroughly before reassembly so no trapped moisture causes rust on steel, swelling on wood, or flavor carryover in the next session. [2]
Knowing when to clean and when to replace is the part that keeps the routine from being a waste of time. Bent teeth, stripped threading, a torn screen, a weak magnet, or a cracked chamber are replacement signals — cleaning will not fix them. [4] Minor discoloration on metal or light staining on wood is cosmetic and can be left alone. [3] For everything else, the six-step deep clean handles the work.
Sources
- Wikipedia: Herb grinder
- Vaping360: How to Clean Your Grinder: A Step-by-Step Guide
- MunchMakers: How to Clean a Grinder: Complete Maintenance Guide 2026
- DaVinci Vaporizer: What Tools or Techniques Are Best for Cleaning Grinders
- DaVinci Vaporizer: Are 4-Piece Grinders Harder to Clean Than 2-Piece Ones?
- NIOSH / U.S. Centers for Disease Control and Prevention: Isopropyl alcohol – IDLH (Immediately Dangerous to Life or Health)
- Leafly: What is a cannabis grinder?