
A rolling machine is a hand-operated tool with two rollers (or a roller and a flexible apron) that compresses ground material into a cylinder and wraps it in a flat rolling paper. To use one, open the roller, place a filter at one end, distribute an even layer of finely ground material along the trough, close the device, and roll both rods toward you for 10 to 20 seconds. Insert a rolling paper with the gummed strip facing up and toward you, roll until only the adhesive is showing, lick the gum, and roll another 10 to 20 seconds to seal. Standard rolling machine sizes are 70mm, 79mm, and 110mm — each one matched to a specific paper format (single wide, 1¼, and king size), and matching the paper to the roller is the single biggest factor in getting a tight, even roll.
This guide walks through the whole process in order: what the device actually is, which size to buy, the step-by-step loading and rolling sequence, where the gummed strip should face when you insert the paper, how to fix a loose or canoeing roll, whether pre-rolled cones work in a roller, and how long to let the finished roll rest before lighting. Every step is anchored to published product and tutorial sources so you can follow along with a roller in front of you and not have to guess what comes next.
What Is a Rolling Machine and How Does It Work?
A rolling machine is a hand-operated mechanical tool that holds a measured amount of ground material between two rollers (or a roller and a flexible apron) and shapes that material into a tight cylinder as you turn the rollers by hand[1]. It removes the most error-prone part of rolling by hand — keeping the paper tight and even around the material — and replaces it with a consistent mechanical motion[3]. The device itself is small enough to fit in a pocket, and most beginner rollers cost only a few dollars, which is why they are a common upgrade from hand-rolling for first-time users[4].
The roller works by clamping the material between two curved plastic, wood, or metal rollers and using friction to compress and shape it. As you roll the device, the material is pushed into a consistent cylindrical form, and the rolling paper is then wrapped around that cylinder and sealed. The result is a roll that is far more uniform than most people can achieve by hand on their first few attempts. A complete beginner roller kit usually has the roller itself, a small stick or pokey tool, and sometimes a set of paper guides — everything you need to start. If you are shopping for your first set, the Rolling category is a good place to compare beginner options side by side.
The two main styles you will see are a true two-roller design (sometimes called a cigarette roller) and a roller-and-apron design (sometimes called a joint roller). The two-roller style is the simplest: both rollers turn and the paper wraps around the outside. The roller-and-apron style uses a flexible flap that catches and wraps the paper for you, which is helpful for first-time users because it removes one step. Most published walkthroughs for beginners assume the roller-and-apron style, so if you are following along with a tutorial, the step-by-step below applies to that design[3][4].
- 1. Rollers (or rollers and apron) — the curved plastic, wood, or metal parts that compress and shape the material as you turn them by hand.
- 2. Loading trough — the open channel between the rollers where you place the filter and the ground material before closing the device.
- 3. Paper guide or flap — the part that holds the rolling paper in place and points the gummed strip upward so it seals cleanly.
- 4. Stick or pokey tool — a small plastic or wooden pin used to push stray material back into the roll and to pack the ends before sealing.
Which Rolling Machine Size Should You Use (70mm, 79mm, or 110mm)?
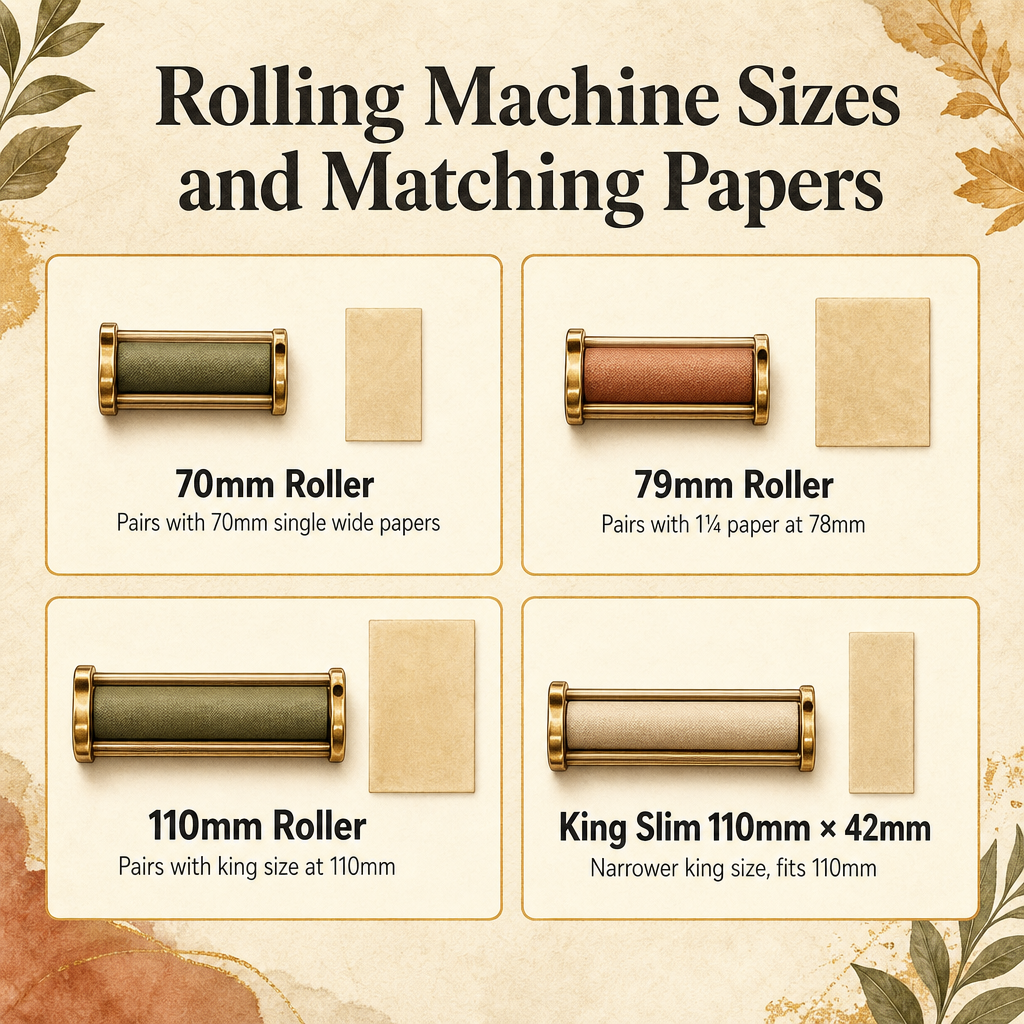
The three standard manual rolling machine sizes are 70mm, 79mm, and 110mm, and each one is matched to a different paper format[2]. Picking the right size for the papers you already own is the single biggest decision in buying a roller, and the wrong match is the most common reason a roll comes out loose, lumpy, or burns unevenly. If you are starting from scratch, the 70mm size is the most beginner-friendly because it matches the smallest standard paper format and uses the least material[6].
Standard rolling paper dimensions are consistent across manufacturers. Single wide papers measure about 70mm long by 36 to 38mm wide, 1¼ papers measure about 78mm long by 44mm wide, 1½ papers measure about 78mm long by 60mm wide, king size papers measure about 110mm long by 55 to 60mm wide, and king slim papers measure about 110mm long by 42 to 46mm wide[5][6]. A roller should match the length of the paper, not the width — the paper wraps around the long axis of the rollers and the seam ends up running along the side of the finished roll. If you want a deeper rundown of how each paper format differs, the What Are Rolling Paper Sizes and Which One Should I Use? post walks through every standard size.
The 70mm roller is the smallest standard size and is matched to single wide papers, which is the format RAWthentic and other manufacturers list as the typical first-roller pairing[1][6]. The 79mm roller is matched to 1¼ papers, which is the most common format for hand-rolled cigarettes and a popular second step up from single wide[2][5]. The 110mm roller is matched to king size and king slim papers, both of which are about 110mm long — the only difference is width, so king slim papers produce a thinner finished roll on the same roller[5]. If you already own a mix of paper sizes, picking one roller that matches the length of the papers you buy most often will cover most of what you roll.
- 70mm roller — matched to single wide papers at about 70mm × 36 to 38mm; smallest standard size and the easiest for first-time users to load and seal.
- 79mm roller — matched to 1¼ papers at about 78mm × 44mm; the most popular size for standard cigarette-style rolls and the second step up from single wide.
- 110mm roller — matched to king size papers at about 110mm × 55 to 60mm; produces a wider, longer finished roll and works with king slim papers at about 110mm × 42 to 46mm.
- 1½ papers at about 78mm × 60mm — a wider 1¼-length paper that still fits a 79mm roller for length but produces a noticeably wider roll than standard 1¼ papers.
How Do You Load and Roll With a Rolling Machine Step by Step?
The full sequence from open roller to sealed roll takes under two minutes once you have done it a few times. Before you start, set up a small work area with your roller, your paper, a filter or tip, your ground material in a small dish, and a flat surface to work on. A clean rolling tray makes loading much easier because nothing rolls off the edge as you pour material into the trough[4]. If you are picking your first full setup, the What Is the Best Smoking Piece for a Beginner? post walks through the basic beginner accessories most first-time rollers end up buying.
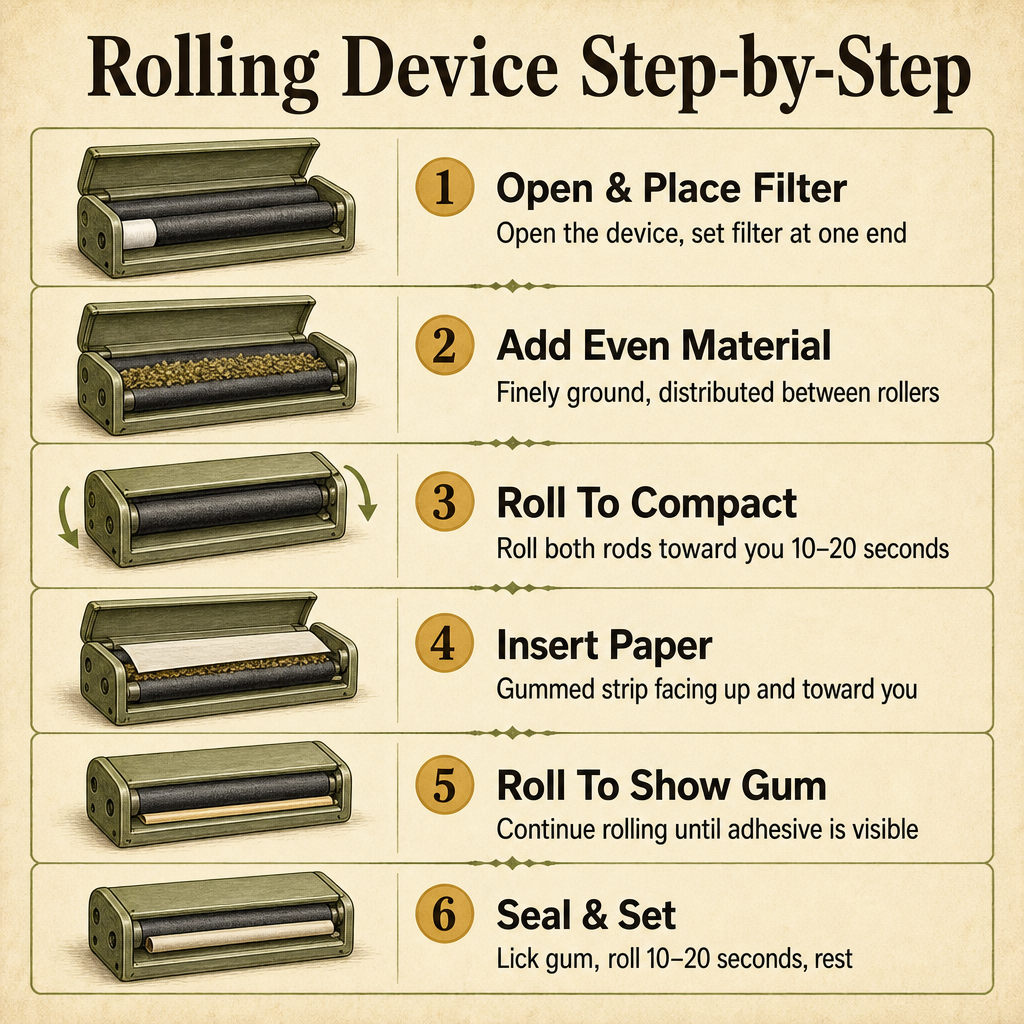
Open the roller by sliding the two rollers apart or lifting the apron, depending on the model. Place a filter tip at one end of the loading trough — filters are optional but they give you something to hold and keep loose material from falling out the end of the finished roll[3]. Then add a thin, even layer of finely ground material along the rest of the trough. Do not pack it in; you want the layer to be even end to end so the finished roll burns evenly. Close the rollers and turn both rods toward you in a smooth, steady motion for 10 to 20 seconds, which compacts the material into a uniform cylinder. If you stop too early, the roll will be loose; if you stop too late, you are usually fine, but the material can sometimes squeeze out the open end[3][4].
Once the material is compacted, the next step is the paper. Insert the rolling paper into the roller with the gummed strip facing up and toward you, sliding it between the rollers and the formed cylinder of material. Continue rolling the device toward you until only the gummed strip is visible — that is the signal that the paper is fully wrapped and the seam is exposed for sealing. Lick the gummed strip along its full length, then roll the device another 10 to 20 seconds so the moistened adhesive sticks to the paper underneath. The finished roll should slide out of the roller, and you can give the open end a gentle twist or pack it with the pokey tool to keep material from spilling[3][4].
- 1. Open the roller and place a filter tip at one end of the loading trough so the finished roll has a built-in handle.
- 2. Distribute a thin, even layer of finely ground material along the trough without covering the filter or piling it up at one end.
- 3. Close the rollers and turn both rods toward you in a smooth motion for 10 to 20 seconds to compact the material into a uniform cylinder.
- 4. Insert a rolling paper with the gummed strip facing up and toward you, then continue rolling until only the adhesive strip is showing.
- 5. Lick the gummed strip along its full length and roll the device another 10 to 20 seconds to seal the seam.
- 6. Slide the finished roll out, gently twist or pack the open end, and set it seam-down on a flat surface for about 30 seconds before lighting.
Where Should the Gummed Strip Face When You Insert the Paper?
Paper orientation is the single most common mistake first-time users make with a rolling machine, and it is the reason most dry or unsticky seams happen. The gummed strip must face up and toward you as you insert the paper — that is the side that will be exposed after the paper wraps around the formed cylinder, and that is the side you need to be able to lick to seal the roll[3][4]. If the gummed strip is facing down or away from you, it ends up on the inside of the wrap, and there is no exposed adhesive to seal the seam.
Most rolling papers have a visual cue for the gummed strip. It is usually a thin, slightly shiny band along one edge of the paper that looks and feels different from the rest of the sheet. Before you start, hold a single sheet up to the light and look for that band. Once you have identified it, slide the paper into the roller so the band runs along the top edge and the rest of the paper follows the natural curve of the rollers. If you are new to this and want a deeper breakdown of how the paper format and roller size interact, the What Bong Size Should You Get? post walks through the same idea for bong sizing — picking the right fit for your gear rather than guessing.
After inserting the paper, do not roll all the way through immediately. Continue rolling the device toward you in short, smooth passes until only the gummed strip is visible at the top. That is your cue to stop turning, lick the exposed adhesive along its full length, and then resume rolling for another 10 to 20 seconds so the adhesive bonds to the paper underneath. A common beginner error is to lick the paper before the gummed strip is fully exposed, which means the adhesive ends up on the rollers instead of on the seam, and the roll will not seal.
- 1. Identify the gummed strip on your paper before inserting it — it is usually a thin, slightly shiny band along one edge.
- 2. Slide the paper into the roller with the gummed strip facing up and toward you so the adhesive ends up on the outside of the wrap.
- 3. Continue rolling until only the gummed strip is exposed at the top of the device, then stop turning before you lick.
- 4. Lick the exposed adhesive along its full length and roll another 10 to 20 seconds so the gum bonds to the paper underneath.
Why Does Your Roll Come Out Loose, Uneven, or Burn on One Side?
Most rolling machine problems come from loading and material distribution, not from the machine itself. The four most common beginner issues are loose rolls, torn paper, canoeing (uneven burn down one side), and material falling out the open end. Each one has a specific cause, and once you know the cause, the fix is usually a single adjustment to your loading or rolling speed. If you want to start fresh with better paper, the Rolling Papers subcategory has the full range of single wide, 1¼, king size, and king slim options.
A loose roll almost always means the rollers did not run long enough to fully compact the material, or the layer was too thin to begin with. The fix is to add a slightly more generous amount of finely ground material and roll the device toward you for a few extra seconds. A roll that is rock-hard, by contrast, usually means the material was packed too tightly or it was not ground finely enough; a slightly looser pack with a finer grind produces a more even burn. Torn paper is almost always a speed problem — turning the rollers too fast, or using a delicate paper with too much force, can rip the sheet before the seam seals. Slow down and let the rollers pull the paper through on their own[3][4].
Canoeing, which is when the roll burns faster down one side than the other, is the issue that frustrates beginners the most, and it is almost always caused by uneven material distribution during loading. If the layer is thicker at one side of the trough, the thinner side burns through faster and the cherry runs down that edge. The fix is to repack the contents so the layer is even end to end, and to roll a little longer to make sure the material is fully compacted. Material falling out the open end is usually a sign that the roll was overfilled, or that you skipped the final pack-and-twist step that keeps the ends tidy. A quick gentle twist at each open end or a press with the pokey tool is enough to hold everything in place.
- Loose roll — usually a thin material layer or not enough compression cycles; add a slightly more generous amount of finely ground material and roll a few extra seconds.
- Torn paper — almost always rolling too fast or using a delicate paper with too much force; slow down and let the rollers pull the paper through on their own.
- Canoeing (uneven burn down one side) — almost always caused by uneven material distribution during loading, not the machine itself; repack so the layer is even end to end.
- Material falling out the ends — usually overfilling or skipping the final pack-and-twist step; give each open end a gentle twist or pack it with the pokey tool.
Can You Use a Rolling Machine With Pre-Rolled Cones?
No — a rolling machine only works with flat papers and wraps. Pre-rolled cones are formed into their final cone shape at the manufacturer, so the rolling step is already done by the time the cone arrives in the pack. There is nothing for a roller to wrap, and trying to run a cone through a manual roller will usually crush it rather than shape it. If you want a cone shape without hand-rolling, pre-rolled cones are the answer, not a rolling machine[4]. The Pre-Rolled Cones subcategory has the full range of pre-rolled cone sizes if you want to compare what is available.
A pre-rolled cone is filled the same way you would finish a hand-rolled cone: pack ground material into the open end, tamp it down gently with a pokey tool or a small cone loader, and repeat until the cone is filled to the top. The difference is that you skip the wrapping step entirely because the paper is already formed. For beginners who want a cone shape but do not want to fight with hand-rolling, cones are usually a faster path to a finished product. Most published walkthroughs that recommend rollers for beginners also recommend keeping a pack of cones on hand for the days you do not want to load a machine.
The one place the two products overlap is paper size. Pre-rolled cones are sold in matching paper sizes — 1¼, king size, and king slim are all common cone formats — and they use the same paper material and gummed strip as flat rolling papers. So if you already own a 79mm or 110mm roller and matching papers, you can buy cones in the same size and use both products interchangeably depending on what kind of roll you want that day. The roller covers flat-paper rolls, and the cones cover pre-formed rolls, with no overlap in function.
- Rolling machines accept — flat rolling papers and wraps in the matching size (single wide, 1¼, king size, king slim).
- Rolling machines do not accept — pre-rolled cones, because the cone shape is already formed at the manufacturer and the rolling step is already done.
- Pre-rolled cones accept — ground material loaded into the open end with a pokey tool or small cone loader, then tamped gently until full.
- Common overlap — cones are sold in the same 1¼, king size, and king slim paper sizes as flat papers, so you can keep one paper format and switch between roller and cones as needed.
How Long Should You Let a Rolled Paper Rest Before Lighting?
About 30 seconds. After you seal the gummed strip, set the roll seam-down on a flat surface for roughly half a minute so the adhesive can fully bond to the paper underneath before the roll is moved or lit. Skipping this rest is the most common reason a fresh roll unravels when you pick it up — the gum is still setting, and any handling can break the bond before it has had time to dry. A short rest also lets the material settle evenly inside the wrap, which improves airflow and burn consistency once the roll is lit[4]. If you want to stock up on rollers and tips for your next session, the Rolling Machines subcategory has the full range of compatible sizes.
During the rest, do not press or squeeze the roll. Just set it down seam-down and let gravity do the work. If you are rolling several at once, line them up on a flat tray seam-down and roll them in sequence so each one has time to rest while you finish the next. Once the 30 seconds are up, pick up the roll by the filter end and give the open end a final gentle twist or pack with the pokey tool to keep loose material from spilling. The roll is then ready to use.
A useful habit for beginners is to do the rest and the final pack together as the last two steps of every roll. Think of it as the close-out of the workflow: seal the gum, roll another 10 to 20 seconds, slide the roll out, twist the open end, set it seam-down for 30 seconds, then pick it up. That small habit is what separates a roll that holds together from one that comes apart in your hand on the way to use it. It is also the step most beginners skip, which is why canoeing and unraveling show up so often in beginner troubleshooting threads.
- 1. After sealing the gummed strip, slide the roll out of the device and set it seam-down on a flat surface.
- 2. Leave the roll undisturbed for about 30 seconds so the adhesive can fully bond to the paper underneath.
- 3. Pick up the roll by the filter end, give the open end a gentle twist or pack, and the roll is ready to use.
Frequently Asked Questions
What is the easiest rolling machine size for a beginner?
The 70mm (single wide) roller is the most beginner-friendly size. It matches the smallest standard paper format (about 70mm × 36 to 38mm), requires the least material, and is the size most manufacturers list as the typical first-roller pairing. Single wide papers also seal easily because the gummed strip is short and the seam is simple to lick in one pass.
Can you use a 79mm roller with king size papers?
No. A 79mm roller is matched to 1¼ papers at about 78mm × 44mm, not to king size papers. King size papers are 100 to 110mm long and will not seat properly in a 79mm machine — the paper will not wrap fully around the rollers. You need a 110mm roller for both king size and king slim formats, since both paper sizes are about 110mm long.
How many times do you roll the machine to pack the roll?
Most published walkthroughs recommend rolling both rods toward you in a smooth motion for 10 to 20 seconds to compact the material, then continuing to roll after the paper is inserted until only the gummed strip is showing, then licking the gum and rolling another 10 to 20 seconds to seal the seam. The exact number of turns is less important than the consistency of the motion — slow, even turns produce a tighter pack than fast, jerky ones.
Do you need a filter tip when using a rolling machine?
Filters, also called tips or crutches, are optional but they improve airflow and give you something to hold as you reach the end of the roll. Most step-by-step walkthroughs place the filter at one end of the roller before adding material, so it ends up built into the finished roll. If you are loading finely ground material, a filter also keeps loose bits from falling out the open end.
Why does my roll canoe when I use a rolling machine?
Canoeing, which is uneven burn down one side, is almost always caused by uneven material distribution during loading, not by the machine itself. If the layer in the loading trough is thicker at one end, the thinner end burns through faster and the cherry runs down that side. Repack the contents so the layer is even end to end, roll a few extra seconds to fully compress, and the burn usually evens out on the next attempt.
Are rolling machines only for cigarettes, or can they roll other papers too?
A manual rolling machine works with any flat rolling paper or wrap that matches its size — single wide, 1¼, king size, and king slim papers all work as long as the paper length matches the roller length. Pre-rolled cones are the one exception, because the cone shape is already formed at the manufacturer and there is nothing for the roller to wrap.
Is a Rolling Machine the Right Tool for Your First Roll?
A rolling machine is one of the fastest ways for a beginner to get a tight, even roll without the learning curve of hand-rolling. The core workflow — open, load, compact for 10 to 20 seconds, insert the paper with the gummed strip up and toward you, roll until only the gum shows, lick and seal — takes under two minutes once you have done it a few times, and the mechanical compression removes the most error-prone parts of the hand-rolling process. Picking the matching paper size (70mm single wide, 79mm 1¼, or 110mm king size and king slim) is the biggest decision, and starting with the smallest format is the easiest path to a clean result on your first try.
If you are still deciding whether to hand-roll, use a machine, or skip straight to pre-rolled cones, the practical answer is that all three work and most people end up using a mix. The roller covers flat-paper rolls for days you want to choose your own paper size and grind. Pre-rolled cones cover days you want a cone shape without loading a machine. Both products use the same standard paper sizes, so the paper you buy for one product works with the other. Free shipping on orders $150+ makes it easy to stock up on rollers, papers, and cones in one order and try both workflows side by side.
The fastest path to a consistent roll is to match your roller to your paper size, keep your material finely ground, distribute it in an even layer in the loading trough, and let the roll rest seam-down for about 30 seconds after sealing. Those four habits cover most of what separates a roll that holds together from one that comes apart in your hand. Once you have run through the sequence a few times, the workflow becomes muscle memory, and you can move on to the more interesting decisions — which paper size, which grind, and whether to keep a pack of cones on hand for the days you do not want to load the device.
Sources
- RAWthentic (RAW Rolling Papers): RAW Hemp Plastic Roller — RAW Rolling Machines
- King Palm: Rolling Machine Guide: How to Pick and Use One the Right Way
- wikiHow (co-authored by Lauren Forsch, CBD Expert, and Devin McSween, wikiHow staff writer; fact-checked): How to Roll a Joint Using a Rolling Machine
- Smoke Cones (RAW products retailer): Mastering the RAW Roller: A Step-by-Step Guide
- Zig-Zag (rolling paper manufacturer, est. 1894): Why Size Matters: A Guide to Rolling Paper Dimensions
- Hara Supply (rolling paper and pre-roll cone manufacturer): Guide to Rolling Paper Sizes