

Learning how to open a stuck grinder starts with identifying a magnetic lid or threaded chamber. Hold the adjoining parts, use rubber gloves or a jar-opening pad for grip, and apply gentle, even hand pressure following your model’s directions. Stop if it stays bound. Check the maker’s instructions before trying cold or cleaning liquids. [1] [5]
How do you open a stuck grinder lid or chamber?
These steps are for manual herb grinders, not electric grinders or coffee grinders. Sticky residue and a cross-threaded chamber need different responses. Cleaning may remove buildup, but it does not repair damaged threads.
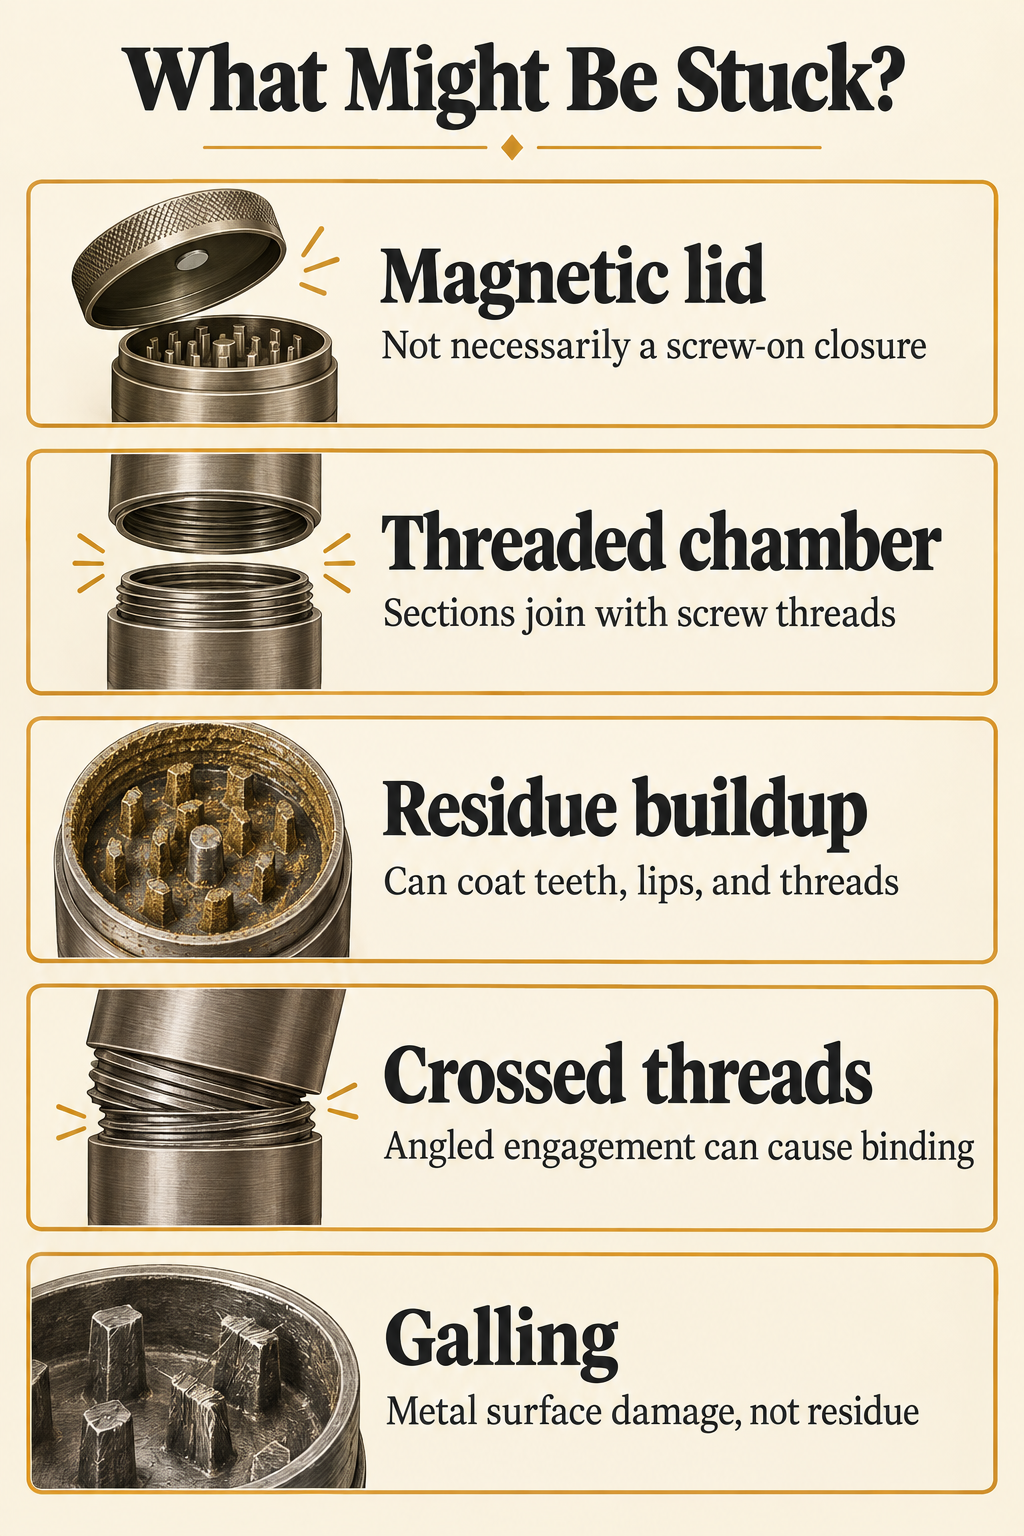
Start by naming the part that is stuck. Is it the grinding lid, the join below the teeth, or a lower collection chamber? Santa Cruz Shredder describes both magnetic lid closures and screw-together sections. That means a grinder can have more than one kind of connection, and the top does not always unscrew. [1]
Check the product manual or the maker’s diagram before choosing an opening motion. A magnetic lid should be opened as that model directs, rather than handled like a screw cap. For a threaded chamber, follow the stated loosening direction. Do not assume that turning the whole stack is working on the stuck join.
Work over a clear tray so loose contents have somewhere to land if the parts separate. Keep your hands and the outside of the grinder dry. Hold the adjoining sections rather than grabbing the lid with one hand and the very bottom with the other. This keeps your effort focused on the connection you mean to open.
Engineer Fix suggests rubberized gloves or a jar-opening pad and steady pressure rather than sudden jerks. Think of these as grip aids, not permission to twist harder. This is practical secondary advice, not a tested promise that any jam will release. [5]
If you are checking which accessory you own, Treehouse Lifestyle’s Rolling category is a browsing starting point, not a source of repair instructions. Use the actual maker’s directions for this attempt. If the join stays bound, check the possible causes below rather than reaching for a tool to gain more leverage.
- Identify the exact stuck join and confirm whether it is magnetic or threaded.
- Hold the two parts directly beside that join, keeping unrelated chambers out of the attempt.
- Add rubber gloves or a jar-opening pad if your hands slip on the outer surface.
- Use gentle, even hand pressure following the model’s opening directions, without a sudden jerk.
- Pause if the connection stays stuck instead of moving on to banging or force. SHAG warns that forcing a grinder can dent metal or strip threads. [3]
Why will your grinder not turn or unscrew?
Buildup is one possible cause, but it is not the only one. SLX points to residue around chamber lips, while HerbSaver describes material collecting on teeth, threads, and screens. Those contact points deserve a look once they are accessible. They do not prove that every closed grinder is stuck because it needs washing. [2] [6]
Cross-threading is a different problem. It happens when threaded pieces engage at an angle instead of lining up. A chamber that became hard to turn as you put it back together may have an alignment problem rather than a thick layer of residue. That history is a useful clue, not proof of the cause from the outside. [5]
Santa Cruz Shredder also describes galling: damage where metal surfaces slide against each other, with roughness, wear debris, and changes to the surface shape. This is the manufacturer’s description of a mechanical issue, not a reason to label every rough-feeling grinder as galled. [1]
Match the response to what you can actually see and know. Cleaning can remove residue; it cannot rebuild stripped threads or reshape bent metal. If a join looks crooked or shows damage, stop rather than assuming a longer soak will restore it.
For background on parts and layouts, read What Should I Look for When Buying a Weed Grinder? or the connection-focused comparison 2-Piece vs 4-Piece Grinder: Which Is Better for You?. Once you know that accessible residue is the issue, How Do You Clean a Grinder Without Damaging It? covers the fuller cleaning routine. Keep the opening problem and the cleanup task separate.
- Residue buildup: material on teeth, chamber lips, or threads can make movement difficult; compatible cleaning addresses that material.
- Angled thread engagement: pieces started at an angle can bind even without heavy buildup; cleaning is not a repair for damaged threads.
- Metal surface damage: roughness, deformation, or visible wear debris calls for inspection rather than another forceful opening attempt.
| Possible cause | What it means | What cleaning can do |
|---|---|---|
| Residue buildup | Material collects on teeth, lips, or threads. | Compatible cleaning can remove accessible buildup. |
| Cross-threading | Threaded pieces engage at an angle. | Cleaning does not repair crossed or damaged threads. |
| Galling | Sliding metal surfaces develop damage, as described by Santa Cruz Shredder. | Cleaning does not restore deformed metal surfaces. |
Can you put a stuck metal grinder in the freezer?
Possibly, if the maker allows it for your exact manual metal grinder. SHAG suggests about 20 minutes in a freezer for a sticky metal grinder, followed by an opening attempt and brushing away accessible residue. This is an optional retailer troubleshooting method for buildup, not a guaranteed fix. [3]
Do the material check first. A metal-looking outside does not tell you everything about the rings, inserts, or finish inside. Do not extend this suggestion to wood, plastic, or a powered device without the maker’s approval. If the care guide says nothing about freezing, ask before trying it.
Keep the purpose narrow: this is a tip for sticky residue, not a thread repair. Do not assume that cooling the whole grinder creates more space between its threads. If a section was forced on crooked or has a visible dent, the freezer does not address that damage.
After the optional attempt, return to the same gentle hand pressure used before. A grip pad can help you hold the parts, but a cold grinder is not a reason to add more force. If it stays bound, move to model-specific guidance rather than repeating an endless freeze-and-twist routine.
- Confirm the grinder’s materials and check whether its maker permits this approach.
- If compatible, consider SHAG’s suggestion of about 20 minutes in the freezer for a sticky metal grinder.
- Try the correct opening motion with gentle, even hand pressure.
- If it opens, brush away accessible loose residue before putting parts back together.
- If the connection remains bound, stop and ask the maker what to do next.
Can you use rubbing alcohol on a stuck grinder?
Only when the maker allows it for the actual materials and parts involved. Rubbing alcohol is not a universal grinder-opening liquid. The body, coating, printed logo, ring, and insert may each need different care. Do not choose a soaking method based only on the outside color or the word metal in a listing.
HerbSaver directs owners of its aluminum grinders to soak disassembled parts in 90% or higher isopropyl alcohol for 20 to 30 minutes. Its routine then calls for brushing the teeth and threads, rinsing, and drying completely. The key word is disassembled: these instructions do not explain how to open a fully sealed grinder first. [6]
SHAG separately suggests a roughly 30-minute alcohol bath for stubbornly stuck aluminum or steel grinders. That retailer advice is not blanket permission to immerse an unknown assembled model. Check with your maker before borrowing the method, especially when the stuck connection hides components you cannot inspect. [3]
Even approved materials come with limits. SLX permits rubbing alcohol on its ceramic coating but warns that solvents can change the logo color. Santa Cruz Shredder says its Delrin friction ring resists isopropyl alcohol; that statement applies to its own component, not every plastic ring. [2] [1]
Plastic and wood need separate decisions. HerbSaver recommends lukewarm water, mild dish soap, and a soft brush for its polypropylene grinders, while advising against alcohol, harsh solvents, dishwashers, ovens, and hair dryers. SHAG warns against alcohol on acrylic and wood. Neither source gives a universal wood-soaking recipe, and one polypropylene product’s instructions do not cover all plastics. [6] [3]
Follow the solvent label and keep alcohol cleaning away from flames, sparks, and heat. NIOSH classifies isopropyl alcohol as flammable and advises preventing skin and eye contact. Never heat an alcohol bath or an alcohol-wet grinder. Those cautions concern the solvent, not whether a grinder’s finish can withstand it. [4]
For a broader maintenance discussion, see How Often Should You Clean Smoking Accessories?. General cleaning habits can help you plan care, but they should not override a material-specific instruction on the grinder in your hand.
- Identify the exact body material rather than assuming every metal-looking grinder is aluminum or steel.
- Check the coating and logo instructions; a finish can have different limits from the body beneath it.
- Look up rings and inserts separately instead of borrowing another brand’s compatibility claim.
- Confirm whether the cleaning method requires parts that are already separated and accessible.
- Follow the maker’s cleaning directions and the solvent label before choosing any liquid or soak time.
What should you clean after the grinder opens?
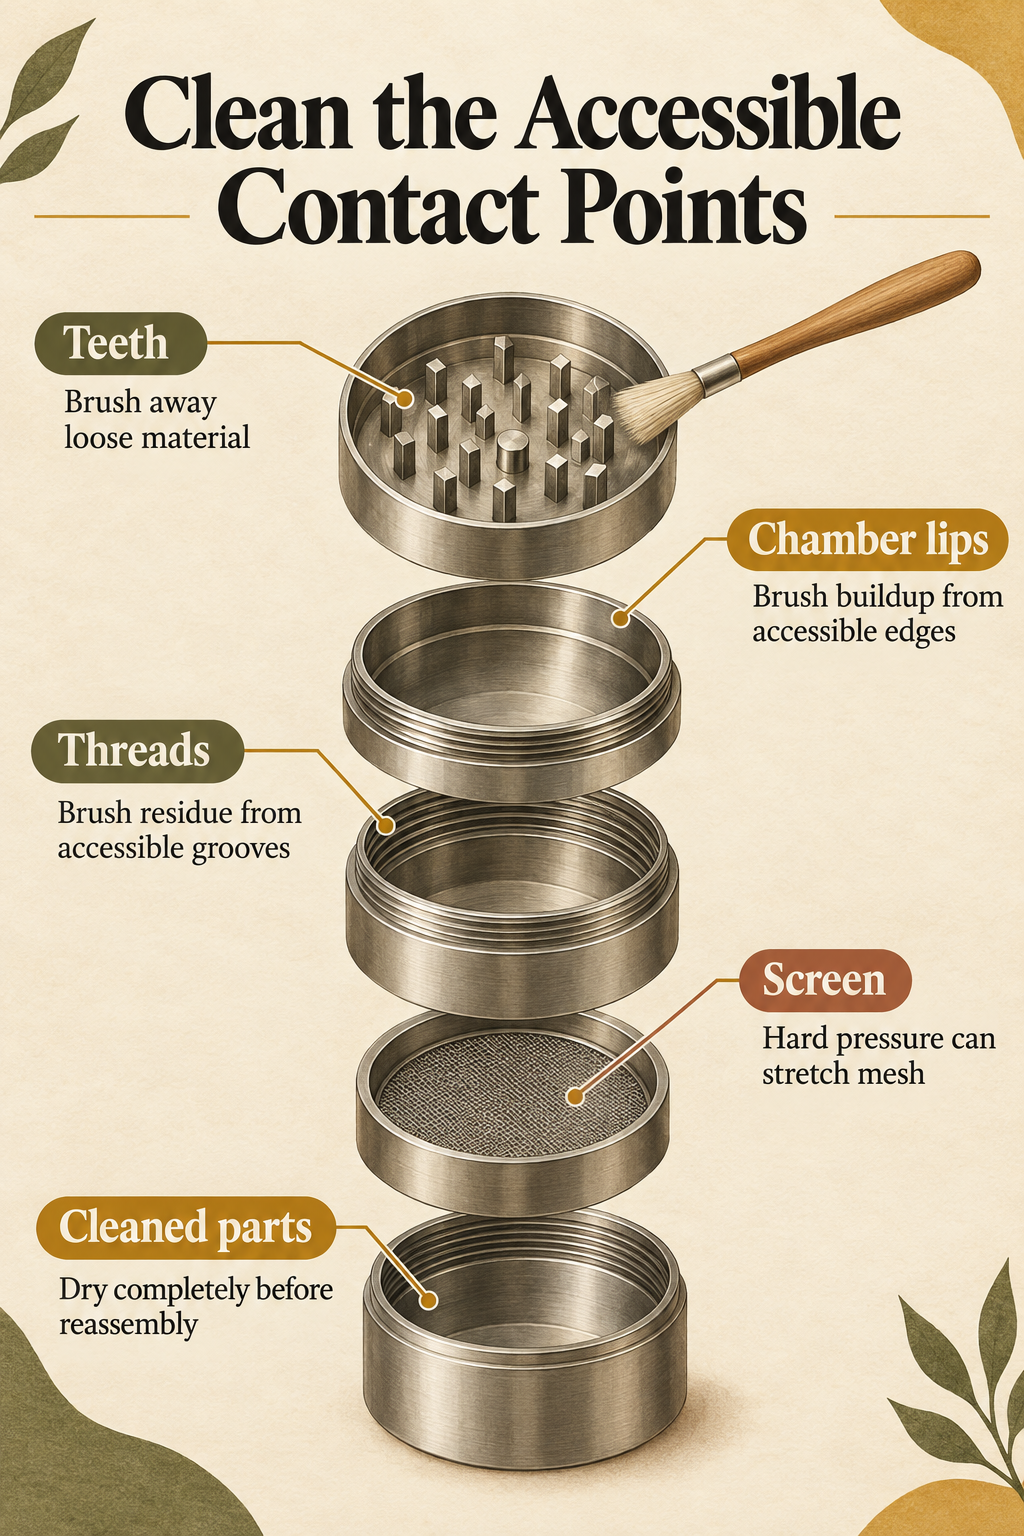
Once the parts separate, focus on the surfaces that meet. Check the teeth, chamber lips, and thread grooves rather than just wiping the outside. Brush loose material away so you can see the edges and check their condition before closing the grinder again. [2] [6]
Use a soft brush without forcing it into a tight gap. SLX suggests a flexible plastic guitar pick for accessible residue on its grinders and warns against metal scraping, which can dislodge its coating. That suggestion is for an open, reachable surface, not for wedging a pick into a sealed lid seam. [2]
Give a collection screen a lighter touch than a solid chamber wall. HerbSaver warns that hard pressure can stretch or tear the mesh. A blocked screen is not a reason to push a sharp point through it or scrub until the mesh changes shape. [6]
If your model permits wet cleaning, complete its full routine, including the stated rinse and complete drying. Do not close the grinder while the threads or screen are still wet. Use the drying instructions for that material rather than trying to speed things up with an oven or hair dryer.
A product name alone cannot supply those care directions. If you own the Treehouse "Leaf" Metal Grinder | Large 2"H X 2.5W, confirm its actual cleaning instructions rather than applying another brand’s aluminum recipe to it. The same rule applies to an unmarked grinder: identify what you own before choosing a liquid.
Finally, look at the newly exposed threads. Removing residue lets you inspect them; it does not prove that rough or deformed edges are repaired. If a cleaned join still resists alignment, leave the pieces apart and ask the maker for advice.
- Brush loose material from the teeth and open chambers so the contact surfaces are visible.
- Clear accessible chamber lips and thread grooves with the tools your maker allows.
- Handle any screen gently, avoiding pressure that stretches or tears the mesh.
- Complete a maker-approved wet clean only if it suits the material, finish, and components.
- Follow the rinsing directions and let every part dry completely before attempting reassembly.
When should you stop trying to open a stuck grinder?
Stop when gentle pressure does not work or the connection appears damaged. SHAG warns that banging and forcing can dent metal or strip threads. SLX warns that metal scraping can damage its coating. A home attempt should not keep escalating just because the lid is still closed. [3] [2]
Based on those damage risks, avoid bare pliers, knife-prying, and hammering. This is a conservative precaution, not a claim that every tool has been tested against every grinder. Extra leverage can take the attempt beyond gentle hand pressure before you have worked out what is wrong.
Do not use heat as the next step, especially if alcohol has been involved. Nor should a stronger solvent be used as a substitute for checking the material. If you cannot identify the finish or hidden ring, uncertainty itself is a good reason to pause.
Contact the maker with the model name, the exact stuck join, and what happened before it jammed. Explain whether it became tight during grinding or while being put back together, and list any cleaning method already tried. Photos of a crooked join, a dent, or exposed thread damage may help the maker advise you.
Ask about inspection, matching replacement parts, or replacement of the unit if needed. Do not assume every jam means buying another grinder. At the same time, a cleaning routine should not be presented as a way to restore deformed threads or damaged sliding surfaces. [1]
- The same join stays bound despite a correct opening motion and gentle hand pressure.
- You can see a dent, a crooked connection, or damaged thread edges.
- A coating appears chipped or scratched, or there is visible wear debris.
- You cannot confirm whether the proposed liquid, temperature change, or tool suits the model.
How can you keep your grinder from getting stuck again?
Build care around the contact points, not a fixed calendar rule borrowed from another person. HerbSaver links overfilling to residue reaching the threads and recommends regular brushing. Pay attention when material gathers around an edge or movement becomes harder instead of waiting for a chamber to bind completely. [6]
Reassembly deserves the same care as cleaning. Set threaded pieces together straight and start them gently. Engineer Fix recommends careful alignment rather than forcing sections together at an angle. If a chamber resists right away, stop and check its position rather than tightening through that resistance. [5]
Friction-ring care is model-specific as well. SHAG highlights keeping that area and the threads maintained, but that does not mean every ring should be removed, soaked, or oiled. Use the maker’s instructions for the part actually fitted to your grinder. [3]
Do not add oil just because the grinder still feels stiff. SLX recommends refined hemp seed oil for its own grinders if brushing does not resolve buildup, while generic advice elsewhere varies. That is not a universal prescription for cooking oil, beeswax, or household penetrating products. Ask your maker before adding any lubricant. [2]
These habits reduce avoidable buildup and alignment problems. They cannot guarantee that a grinder will never stick, and they do not reverse existing damage. If the same clean, dry connection repeatedly binds, keep a note of where it happens and request model-specific help.
- Brush loose debris from the contact surfaces, including accessible lips and threads.
- After approved wet cleaning, let the parts dry fully before joining them.
- Align threaded pieces straight and begin closing them gently.
- Stop if the join resists instead of forcing it to seat at an angle.
- Avoid overfilling during the next use so material is not packed into the contact areas.
- Check the maker’s ring-care and lubricant instructions before adding or removing anything.
Frequently Asked Questions
Does every grinder lid unscrew?
No. Santa Cruz Shredder describes magnetic lid closures as well as screw-together sections. Identify the particular connection before choosing an opening motion. A lower chamber having threads does not mean the grinding lid uses threads too. Follow your model’s directions rather than twisting every part as if it were a jar cap. [1]
Will cleaning fix a cross-threaded grinder?
Cleaning can remove residue, but it does not repair crossed, stripped, or deformed threads. A connection that became tight while being assembled may have started at an angle. Do not keep tightening it to see whether it seats. If gentle attempts fail or damage is visible, ask the maker about inspection or replacement. [5]
Can you soak a wooden grinder to loosen the lid?
There is no universal wood-soaking method in these care directions. SHAG warns against alcohol on wood. Do not borrow an aluminum alcohol bath or a polypropylene soapy-water routine for a wooden grinder. Check the instructions for that model and finish before exposing it to a cleaning liquid. [3]
Should you add oil if your grinder still feels stiff?
Not as a general fix. Lubricant advice varies by model, and stiffness alone does not tell you whether the cause is residue, alignment, or damage. SLX’s refined hemp seed oil recommendation applies to its own grinders. Consult your maker rather than adding household oils or penetrating products to an unknown grinder. [2]
What should you do if your grinder is still stuck?
Leave it alone rather than turning the next attempt into a test of strength. Identify the stuck connection, use a grip aid with gentle hand pressure, and check the actual maker’s care directions. Consider a freezer method or cleaning liquid only when it fits that model’s materials and the likely problem.
If the join stays bound, looks crooked, or shows damage, ask the maker about inspection or a matching replacement part. Once it opens, clean the accessible contact surfaces, dry approved wet-cleaned parts fully, and line up the threads with care. The useful goal is a working grinder, not an open lid at any cost.
Sources
- Santa Cruz Shredder: Features
- SLX Grinders: Herb Grinder Cleaning, Maintenance & Care by SLX Grinders
- SHAG: How to Unstick a Jammed Herb Grinder (And Keep It Spinning)
- CDC / National Institute for Occupational Safety and Health: NIOSH Pocket Guide to Chemical Hazards: Isopropyl alcohol
- Engineer Fix: How to Open a Stuck Grinder and Prevent It
- HerbSaver: How to Clean a Weed Grinder (Plastic & Aluminum): Step-by-Step Guide