
Setting up a hookah means putting the right amount of cold water in the base, seating the stem on top of the base with a rubber base grommet, attaching the hose with a hose grommet, testing the assembly for airtightness, packing the bowl loosely with shisha, covering the bowl with pierced foil or a heat management device, and finally placing lit charcoal on top. Once those steps are right, drawing on the hose pulls fresh air down through the charcoal, vaporizes the tobacco, bubbles the smoke through the water, and delivers a cool draw out the mouthpiece [1] [3].
If you have just unboxed a new hookah, the whole rig can look intimidating — there are stems, grommets, a base, a bowl, a hose, and a tray, and the order you put them together actually matters. This guide walks through every part of the hookah, the correct water depth, the full assembly order, how to pack and cover the bowl, when to reach for foil versus a heat management device, how to choose between quick-light and natural coconut charcoal, and the airtightness test that should always come before lighting.
By the end, you should be able to set up a hookah from scratch in about ten minutes — even if you have never touched one before — and you should know what each piece of the rig does and why the order matters.
What Are the Parts of a Hookah and What Does Each One Do?
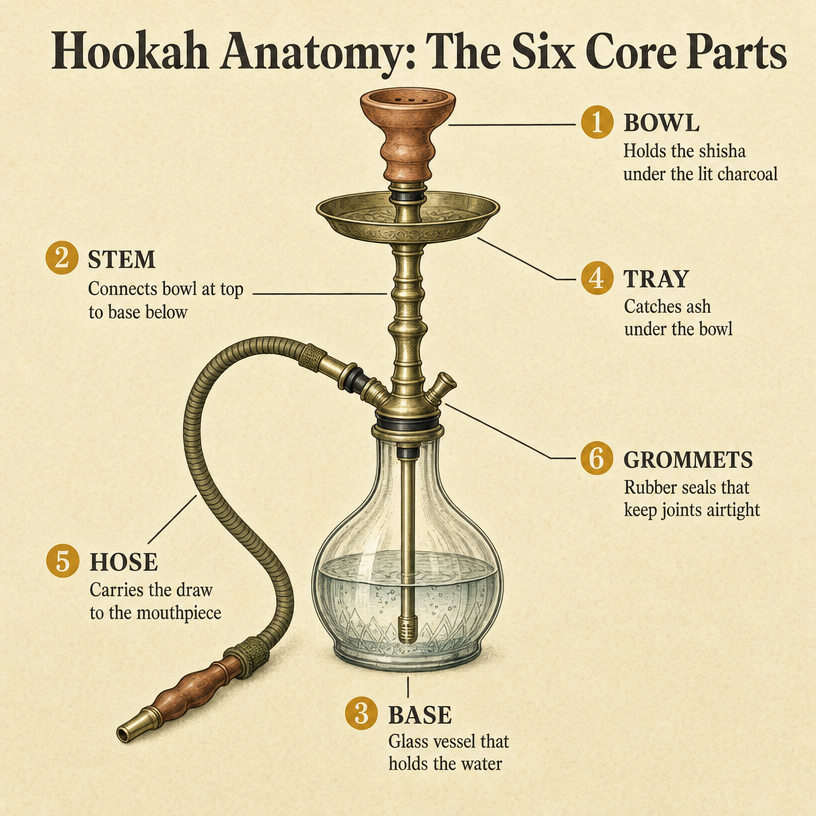
A traditional hookah is made up of six primary parts, plus a couple of small but important extras that show up on most modern rigs. The smoke travels in a clear path: from the heated bowl at the top, down through the stem, into the water in the base, and back up through the hose to the mouthpiece. Once you can name each part and point to where it sits, the assembly steps later in this guide will make a lot more sense [1].
Before you start putting anything together, lay all the parts out on a flat surface in front of you. That way you can see what you have, and you can check the box against the list below to make sure nothing is missing. If you want a deeper primer on how a hookah works end-to-end before tackling setup, the What Is a Hookah and How Does It Work? overview of hookah mechanics is a useful companion read.
Two extras are worth knowing about even though they are not strictly required: a purge valve (a small valve on the side of the stem that lets you blow stale smoke out of the base between draws) and a diffuser (a small attachment on the bottom of the downstem that breaks the airflow into smaller bubbles for a quieter draw). Both are common on mid-range and higher-end hookahs.
- Bowl — the cup at the very top that holds the flavored tobacco and sits directly under the lit charcoal.
- Stem — the metal shaft that connects the bowl at the top to the base at the bottom; the lower section that dips into the water is often called the downstem.
- Base — the glass vessel at the bottom of the rig that holds the water and gives the hookah its weight and stability.
- Tray — the plate that sits under the bowl to catch ash and any falling bits of charcoal.
- Hose — the long flexible tube with a mouthpiece on the end that you actually draw through.
- Grommets — small rubber or silicone rings that seal the joints between parts so the suction does not leak.
- Purge valve — a small valve on the side of the stem that lets you blow stale smoke out of the base between draws.
- Diffuser (optional) — a small attachment fitted to the bottom of the downstem that breaks airflow into smaller bubbles [1].
How Much Water Do You Put in a Hookah Base?
The right water level is simple to set and easy to verify: fill the base with cold water until the bottom of the downstem sits roughly 1 to 1.5 inches (about 2.5 to 3.8 cm) below the waterline. That depth is enough to make the smoke bubble up through the water without making the draw so heavy that you have to pull hard on the hose [2] [5].
If your hookah has a diffuser fitted to the bottom of the downstem, the rule is slightly different — every working hole of the diffuser has to sit below the waterline, or the diffuser will not actually break up the airflow the way it is supposed to. Check this by looking at the downstem through the glass base before you seat the stem on top of the base. If you would like a closer look at how different internal designs change the way a water pipe feels, the What Is a Percolator Bong and How Does It Work? guide to percolator bongs walks through the same kind of internal air-and-water interaction.
Be careful not to overfill. If the waterline is too high, it can splash up into the stem or even out through the hose port when you purge the rig, and it can also stop the stem from seating cleanly on top of the base. Cold water works well — it helps the smoke feel cool on the way out and it does not react with any residue on the glass.
- Pour cold water into the base until the bottom of the downstem sits about 1 to 1.5 inches (2.5 to 3.8 cm) below the waterline.
- If a diffuser is fitted, check that all of its working holes sit below the waterline, not just the tip of the downstem.
- Stop short of the hose port — overfilling causes splash-up into the stem and can stop the stem from seating cleanly.
- Cold water is the standard; it helps the smoke feel cool at the mouthpiece and does not react with residue on the glass [2] [5].
What Is the Correct Order to Assemble a Hookah?
There is a specific order that makes hookah setup work, and it is the order the parts were designed to go together in. Skip a step or do them out of sequence and you will end up with a leak you cannot diagnose, a wet bowl, or a stem that will not seat. The verified sequence below is the one every owner should follow [3]. If you would like a broader walkthrough that puts this in the wider context of how a hookah works, the What Is a Hookah and How Does It Work? complete guide to hookah setups covers the same airflow path in more detail.
Each step has a single, easy-to-check success condition. You can move on to the next step the moment that condition is met, which means you do not have to guess whether something is right — there is a concrete thing to test for.
Two of the steps (the airtightness test and packing the bowl) deserve extra attention because mistakes there are the most common reason a first session goes wrong. The airtightness test is covered in its own section further down; the bowl-packing rules are covered in the section after that.
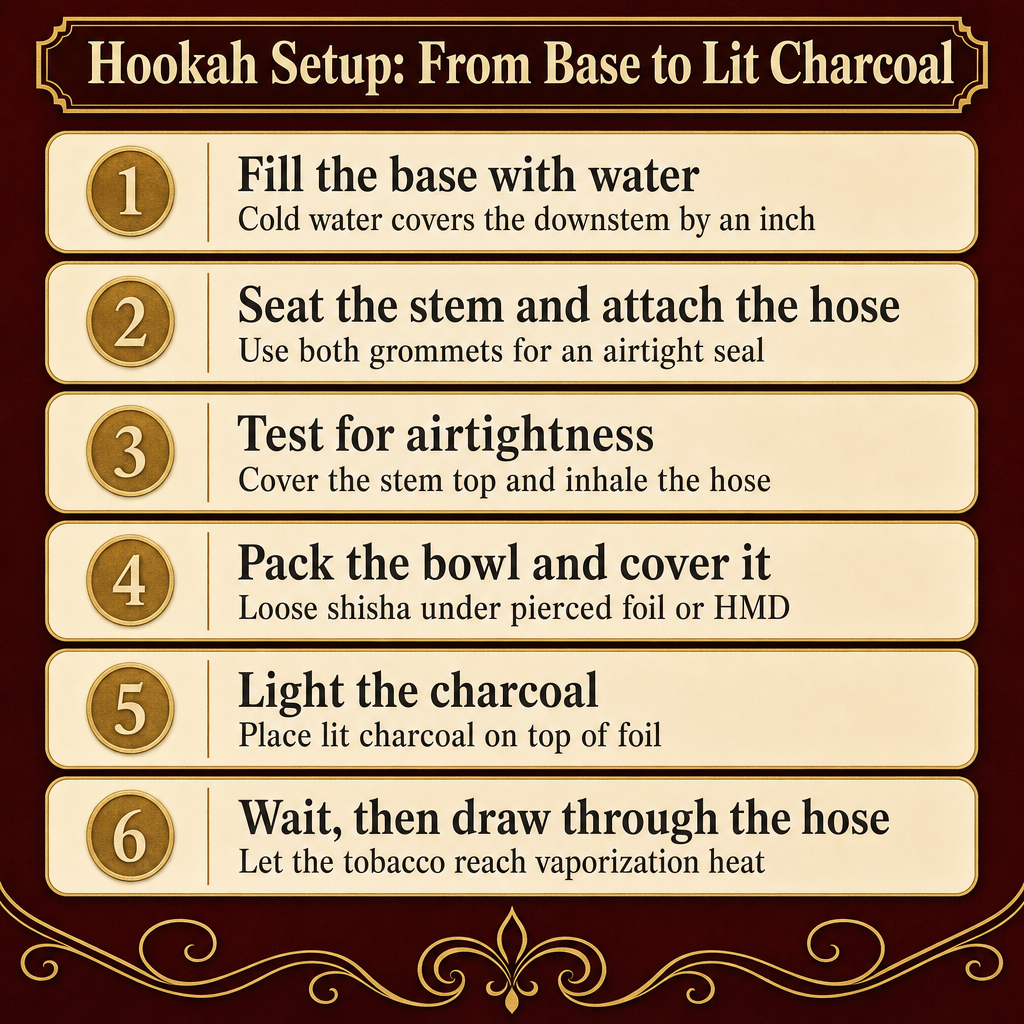
- Fill the base — pour cold water into the base until the bottom of the downstem sits about 1 to 1.5 inches (2.5 to 3.8 cm) below the waterline.
- Seat the stem — lower the stem onto the top of the base with a base grommet in place, then press down gently until it seats flush.
- Attach the hose — push the hose end into the hose port using a hose grommet so the joint is sealed.
- Test for airtightness — place a hand over the top of the stem and inhale through the hose; any leak at a grommet needs to be reseated.
- Pack the bowl — fill the bowl loosely with shisha, no pressing down, so airflow stays open through the tobacco.
- Secure the bowl — set the bowl on top of the stem using a bowl grommet so the seal at the bowl-stem joint is airtight.
- Cover the bowl — stretch foil tight over the bowl and pierce it with small holes, or fit a heat management device in place of foil.
- Light the charcoal — once everything is sealed and the bowl is covered, place lit charcoal on top of the foil or HMD [3].
How Do You Pack a Hookah Bowl and Cover It with Foil?
Bowl packing is the single step most beginners get wrong, and it is also the step that has the biggest effect on how the session actually feels. The rule is simple: pack the shisha loosely in the bowl, do not press it down, and leave a little air space at the top. Air has to be able to flow down through the tobacco as you draw on the hose, and a packed-down bowl chokes that airflow off [4].
The other key rule is about heat, not packing: the goal is to heat the tobacco enough to release smoke from its molasses base, not to burn the leaf. Burning it produces a harsh, charred taste and wastes shisha. The way to tell the difference in practice is by feel — a properly heated bowl feels warm to the touch through the foil and never feels hot. If you want to pair your setup with a simple accessory for lighting, the Electric Rigs listing for an electric rig is one way to keep flame sources consistent while you finish setup.
Foil is the default cover. Cut a square of heavy-duty aluminum foil large enough to drape over the bowl with a little overhang on every side. Stretch it tight — loose foil lets heat escape around the edges — and wrap the overhang snugly around the outside of the bowl so the foil does not pop off when the heat builds. Then poke small holes evenly across the foil with a toothpick, a needle, or a foil poker. Skip the center on phunnel-style bowls, which have a center spout that needs airflow underneath the tobacco [4].
- Fill the bowl loosely — drop shisha into the bowl until it is level with the rim, then leave it; do not press down.
- Keep the tobacco fluffy — loose shisha lets air flow through it; pressed-down shisha chokes the draw.
- Cover the bowl with foil — cut a square of heavy-duty foil, stretch it tight across the rim, and wrap the overhang snugly around the outside of the bowl.
- Pierce the foil evenly — poke small holes with a toothpick or needle across the surface, skipping the center on phunnel-style bowls.
- Aim to heat, not burn — the goal is to release smoke from the molasses base; burning produces a harsh taste and wastes shisha [4].
Foil or Heat Management Device: Which Should a Beginner Use?
Foil is the simplest cover and the one every beginner should start with. You stretch a square of foil tight over the bowl, pierce it with small holes, and place lit charcoal on top. There is nothing to assemble, nothing to learn, and replacement foil costs almost nothing. For casual sessions, foil is all you need [3] [4].
A heat management device, or HMD, is a small metal accessory that sits directly on top of the bowl in place of foil. It replaces the foil-and-charcoal stack with a single unit that regulates how the charcoal heats the tobacco. HMDs come in different designs, but they all do roughly the same job: they spread heat more evenly, they let you adjust how much heat reaches the tobacco, and they tend to make longer sessions more consistent because the temperature stays steadier over time.
The trade-off is cost and a small learning curve. An HMD costs more than a sheet of foil, and it takes a session or two to learn how to position the charcoal inside it so the heat lands where you want it. For most beginners, foil is the right place to start; an HMD is a useful upgrade once you know you are going to use the hookah regularly. If you already browse hand-pipe accessories and want something compact to keep next to the rig, the Chillums chillum listing is a popular small-format option for taster sessions.
- Foil — a square of pierced heavy-duty foil stretched over the bowl with charcoal on top; cheapest, simplest, the default for beginners.
- Heat management device (HMD) — a metal accessory that replaces foil and regulates how charcoal heats the tobacco; spreads heat more evenly.
- Consistency — HMDs tend to keep the temperature steadier over a long session, while foil needs manual charcoal management.
- Cost — foil costs almost nothing; an HMD is a one-time purchase that lasts for years with basic cleaning.
- Learning curve — foil needs no instructions; an HMD takes a session or two to learn to position the charcoal correctly [3] [4].
| Foil | Heat Management Device (HMD) | |
|---|---|---|
| Cover type | Stretched heavy-duty foil pierced with small holes | Metal accessory that replaces foil |
| Setup time | Cut, stretch, wrap, pierce — about two minutes | Drop onto the bowl — under a minute |
| Heat control | Manual — adjust by moving charcoal around | Built-in vents regulate airflow and heat |
| Session length | Needs charcoal rotation every 15–20 minutes | Holds a steady temperature for an hour or more |
| Cost | A few cents per bowl (a roll of foil lasts months) | One-time purchase that lasts for years with cleaning |
| Best for | Casual sessions, beginners, anyone trying foil first | Regular sessions, longer gatherings, repeat owners |
Quick-Light or Natural Coconut Charcoal: Which Should You Buy?
Charcoal is what heats the tobacco, and the type you choose changes how easy it is to start a session and how that session feels once it is running. There are two main options: quick-light charcoal, which is impregnated with a chemical accelerant to make it light from a regular flame, and natural coconut charcoal, which is made from compressed coconut shells and lights from a burner or stove top [6].
Quick-light is convenient. You hold a piece over a lighter or stove flame for a few seconds and it sparks up on its own, which is why it is often the first thing a new owner reaches for. The trade-off is that the accelerant coating gives the charcoal a faster, hotter burn and a shorter life — a quick-light piece often only lasts 30 to 45 minutes before it needs replacing. It also tends to leave a faint chemical taste during the first few minutes of a session.
Natural coconut charcoal is the standard for regular sessions. The briquettes take longer to light — you need a coil burner, a stove burner, or a lighter held to them for a couple of minutes — but once they are lit they burn evenly for an hour or more, and they leave only a faint ash and almost no flavor of their own. For most owners, the practical decision is to keep a small box of quick-light around for emergencies and use natural coconut charcoal the rest of the time. If you want to keep your lighting setup simple, the Randy’s Hemp Wick with Lighter Holder – 15.5ft (All Natural) listing for a natural hemp wick with a lighter holder is a popular low-flame option that pairs well with either charcoal type.
- Quick-light charcoal — impregnated with a chemical accelerant; lights from a regular flame in seconds; burns hot and short; can leave a faint taste.
- Natural coconut charcoal — compressed coconut-shell briquettes; needs a burner to light; burns evenly for about an hour; produces very little ash.
- Ignition speed — quick-light wins for convenience; natural charcoal takes a couple of minutes on a coil or stove burner.
- Session length — quick-light typically lasts 30 to 45 minutes; natural coconut charcoal lasts an hour or more per piece.
- Flavor — natural coconut charcoal is widely described as producing a flavor-neutral heat that lets the shisha’s own flavor come through.
- Common starter pack — many owners keep a small box of quick-light for emergencies and use natural coconut charcoal for regular sessions [6].
| Quick-Light Charcoal | Natural Coconut Charcoal | |
|---|---|---|
| Composition | Charcoal impregnated with a chemical accelerant coating | Compressed coconut-shell briquettes, no accelerant |
| How to light | Hold over a lighter or stove flame — sparks in seconds | Needs a coil burner or stove top — a couple of minutes |
| Burn time per piece | About 30 to 45 minutes | About an hour or more |
| Heat profile | Hotter, faster — burns through a bowl quickly | Even, steady heat that lasts across a long session |
| Flavor | Can leave a faint chemical taste for the first few minutes | Widely described as flavor-neutral — lets shisha flavor come through |
| Best for | First sessions, emergencies when no burner is around | Regular sessions, anyone who smokes the same hookah often |
How Do You Test a Hookah for Airtightness Before Lighting?
The airtightness check is the single most useful step you can add to your setup routine. It takes about five seconds and it catches every common leak before you ever light the charcoal. Once you have seated the stem on the base and attached the hose with both grommets in place, place your hand flat over the open top of the stem where the bowl will sit, then try to inhale through the hose [3].
If the rig is sealed correctly, you should not be able to pull any air at all — the suction should hold for several seconds with your hand in place. If you can feel air pulling past your fingers, or if you can hear a hiss anywhere along the joints, there is a leak at one of the grommets and the seal needs to be reseated before you go any further.
Leaks at the hose port and at the stem-base joint are the two most common spots. The fix in both cases is the same: pull the joint apart, check that the grommet is sitting squarely in its groove with no twist or fold, and reseat the two halves firmly. Re-run the airtightness test after any reseat. Only move on to packing the bowl, covering it, and lighting the charcoal once the suction holds. If you want a small accessory to keep next to the rig while you run setup checks, the INSIDE OUT DICHRO HAND PIPE SPOON listing for a compact dichro hand pipe is a popular taster-size companion.
- Cover the top of the stem — place your hand flat over the open top of the stem where the bowl will sit.
- Inhale through the hose — try to draw air through the hose; the suction should hold for several seconds with your hand in place.
- Listen for hiss — any hiss along the joints means there is a leak that needs to be reseated before lighting.
- Check the grommets — pull each joint apart, confirm the grommet is sitting squarely with no twist or fold, and reseat firmly.
- Re-test before lighting — only move on to packing the bowl and lighting the charcoal once the suction holds completely [3].
Frequently Asked Questions
How do I know if my hookah is airtight?
After the stem is seated on the base and the hose is attached, place your hand over the top of the stem and try to inhale through the hose. If you can pull any air past the grommets, the seal needs to be reseated before you light the charcoal [3].
Should a beginner use quick-light or natural coconut charcoal?
Quick-light charcoal ignites faster because of a chemical accelerant coating and works when you do not have a burner, while natural coconut charcoal (coconut-shell briquettes) burns longer and is widely described as producing a flavor-neutral heat. For regular sessions most owners move to natural coconut charcoal [6].
Do I need a heat management device, or is foil fine?
Foil is the simple default — stretched tight over the bowl, perforated with small holes, and topped with charcoal. A heat management device is an optional metal accessory that sits on top of the bowl in place of foil and regulates how the charcoal heats the tobacco, and it is a popular upgrade for longer sessions [3] [4].
What does a hookah diffuser do, and is it necessary?
A diffuser is a small attachment fitted over the bottom of the downstem that breaks the airflow into many smaller bubbles as the smoke passes through the water. Its two practical effects are a quieter draw and a smoother, less restricted pull; it is an optional upgrade, not a required part [7].
What is the legal age to buy hookah tobacco in the United States?
Under federal law (Tobacco 21, signed December 20, 2019, and codified in FDA’s August 2024 final rule), it is illegal for any retailer to sell tobacco products — including hookah or waterpipe tobacco — to anyone under 21 years of age, with no exceptions [8].
So How Do You Set Up a Hookah the Right Way?
Setting up a hookah is mostly about following the right order and stopping to check your work at each step. Pour cold water into the base until the downstem sits about 1 to 1.5 inches (2.5 to 3.8 cm) below the waterline, seat the stem on the base with a base grommet, attach the hose with a hose grommet, run the airtightness test before you light anything, pack the bowl loosely, cover it with pierced foil or a heat management device, and finally place lit charcoal on top. Each of those steps has a single, easy-to-check success condition, and the airtightness test is the one that catches the mistakes most first-time owners make.
Once you have the basic sequence down, the only real decisions left are about charcoal and heat management. Quick-light charcoal is the easy on-ramp for a first session; natural coconut charcoal is the standard for regular use. Foil is the simple default for covering the bowl; a heat management device is an optional upgrade for longer sessions. Everything else — single-hose versus multi-hose, stem material, base size, tray style — comes down to personal preference.
Treehouse ships hookah gear, charcoal, bowls, hoses, and accessories with free shipping on orders $150+, so it is easy to put a full starter setup together in one order — base, stem, hose, bowl, foil or HMD, and a box of natural coconut charcoal. After that, every setup follows the same eight steps, and the airtightness test is what tells you when it is right.
Sources
- HOOB Hookahs: What Is a Hookah Made Of? Parts, Anatomy & How It Works
- HOOB Hookahs: How Much Water to Put in a Hookah: The Correct Level
- TheHookah.com: Hookah Setup Guide
- Moze Shisha: Prepare the perfect hookah tobacco bowl — Best Taste!
- wikiHow: How to Set Up a Hookah (& Smoke One)
- Hookah.com: Natural Hookah Charcoal vs. Quick Light Hookah Coals
- Hookah.com: What is a Hookah Diffuser? Smooth Your Draw & Reduce Noise
- U.S. Food and Drug Administration: Tobacco 21